Appearance
Email Campaigns
Once your list and forms are set, you are ready to go for creating an email campaign. You can run email campaigns to send your marketing messages to the subscribers who opted for your marketing messages. In FluentCRM, an email campaign is a bulk email marketing campaign that is sent to many contacts at once instantly or in a scheduled time defined by you. This is as easy as adding a template, adding the content, designing the template, selecting your audience group, and then sending it off to your subscribers.
Things to do before you start an email campaign with FluentCRM
- Firstly make sure you have subscribers in your contact lists. If you don’t have subscribers in your contact lists, Import Contacts into FluentCRM or follow the Opt-in Forms (Fluent Forms) Basic Configuration to capture leads from a Signup form.
- Be sure to configure FluentCRM Global Settings before you start sending your first email campaign.
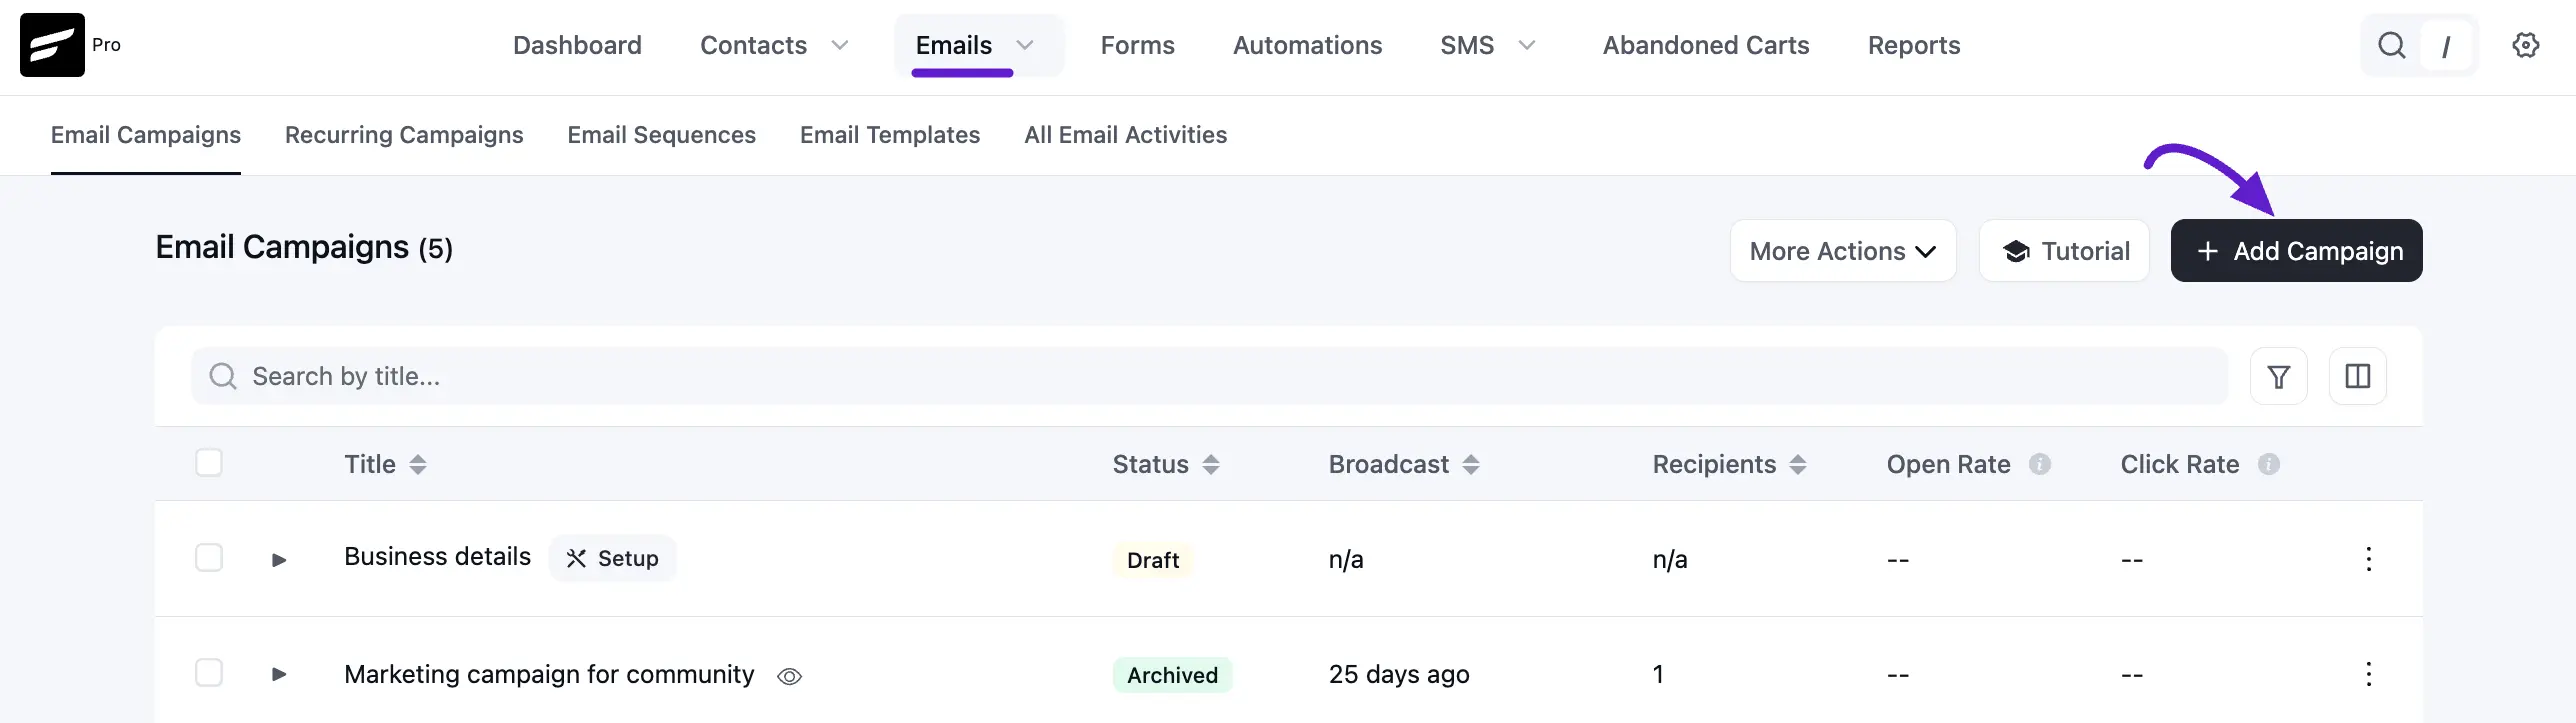
1. Create a New Campaign
From Emails ➜ Campaigns, you can create an email campaign by clicking on the + Add Campaign button.
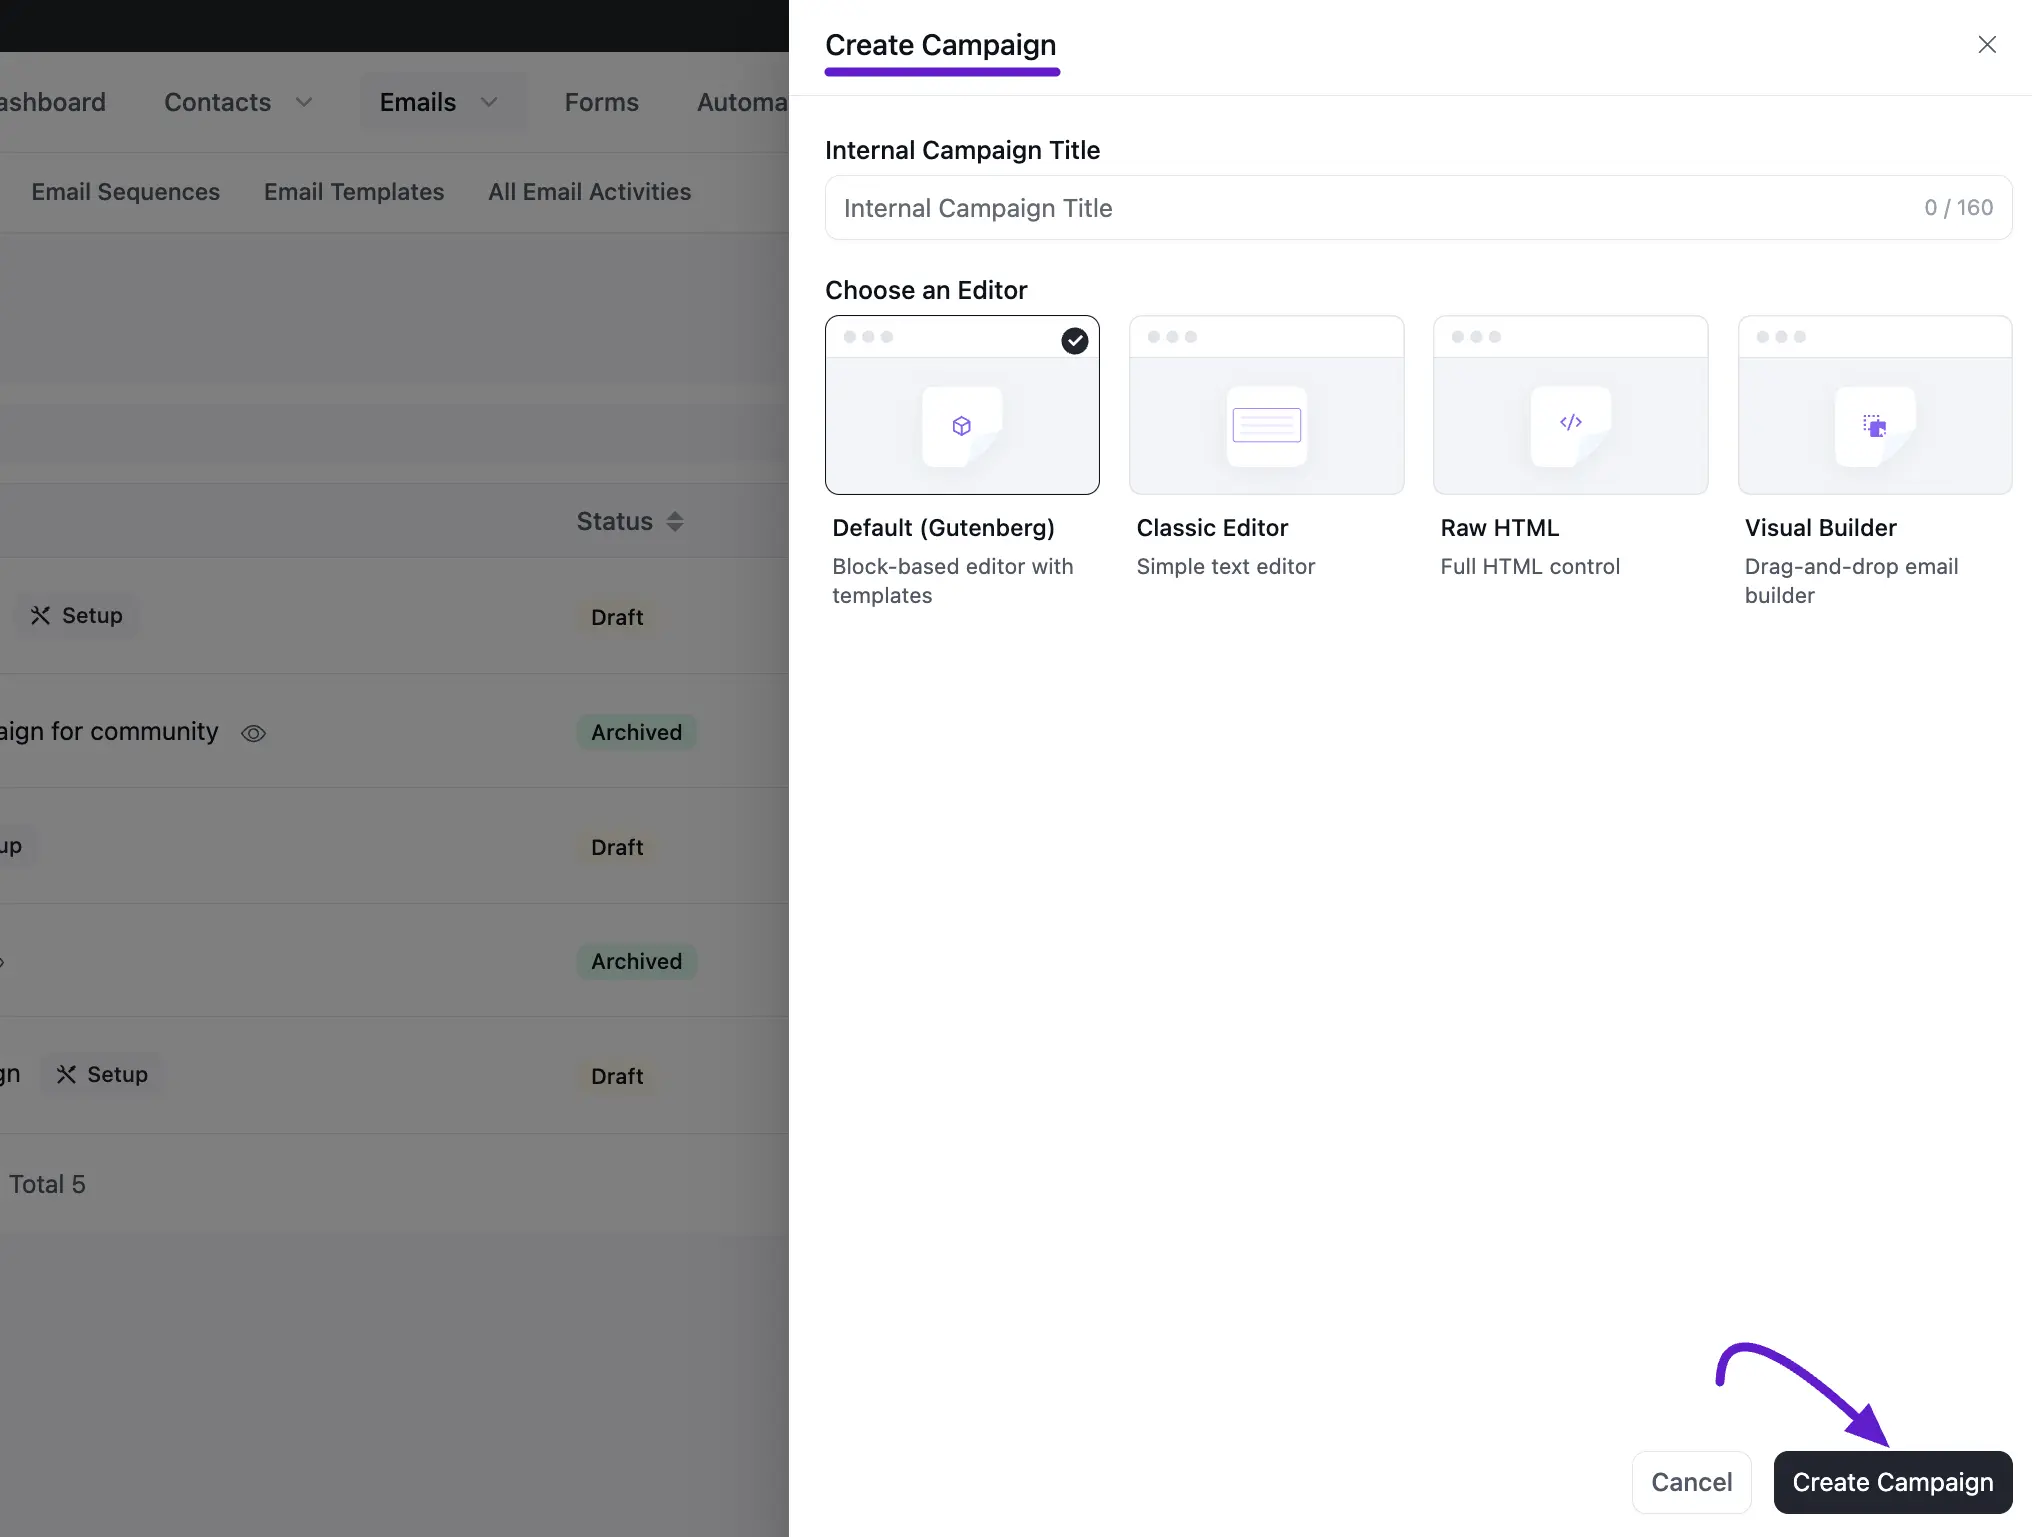
A popup will appear asking for an Internal Campaign Title. This name is for your reference only and will not be seen by subscribers. After entering the title, choose your preferred editor:
- Default (Gutenberg): The v3 Gutenberg-native editor with device preview, Email Patterns, and AI Writing.
- Visual Builder: A drag-and-drop builder for highly designed layouts.
- Classic Editor: A simple, traditional text editor.
- Raw HTML: For advanced users who want to paste custom code.
Click Create Campaign to move to the editor.
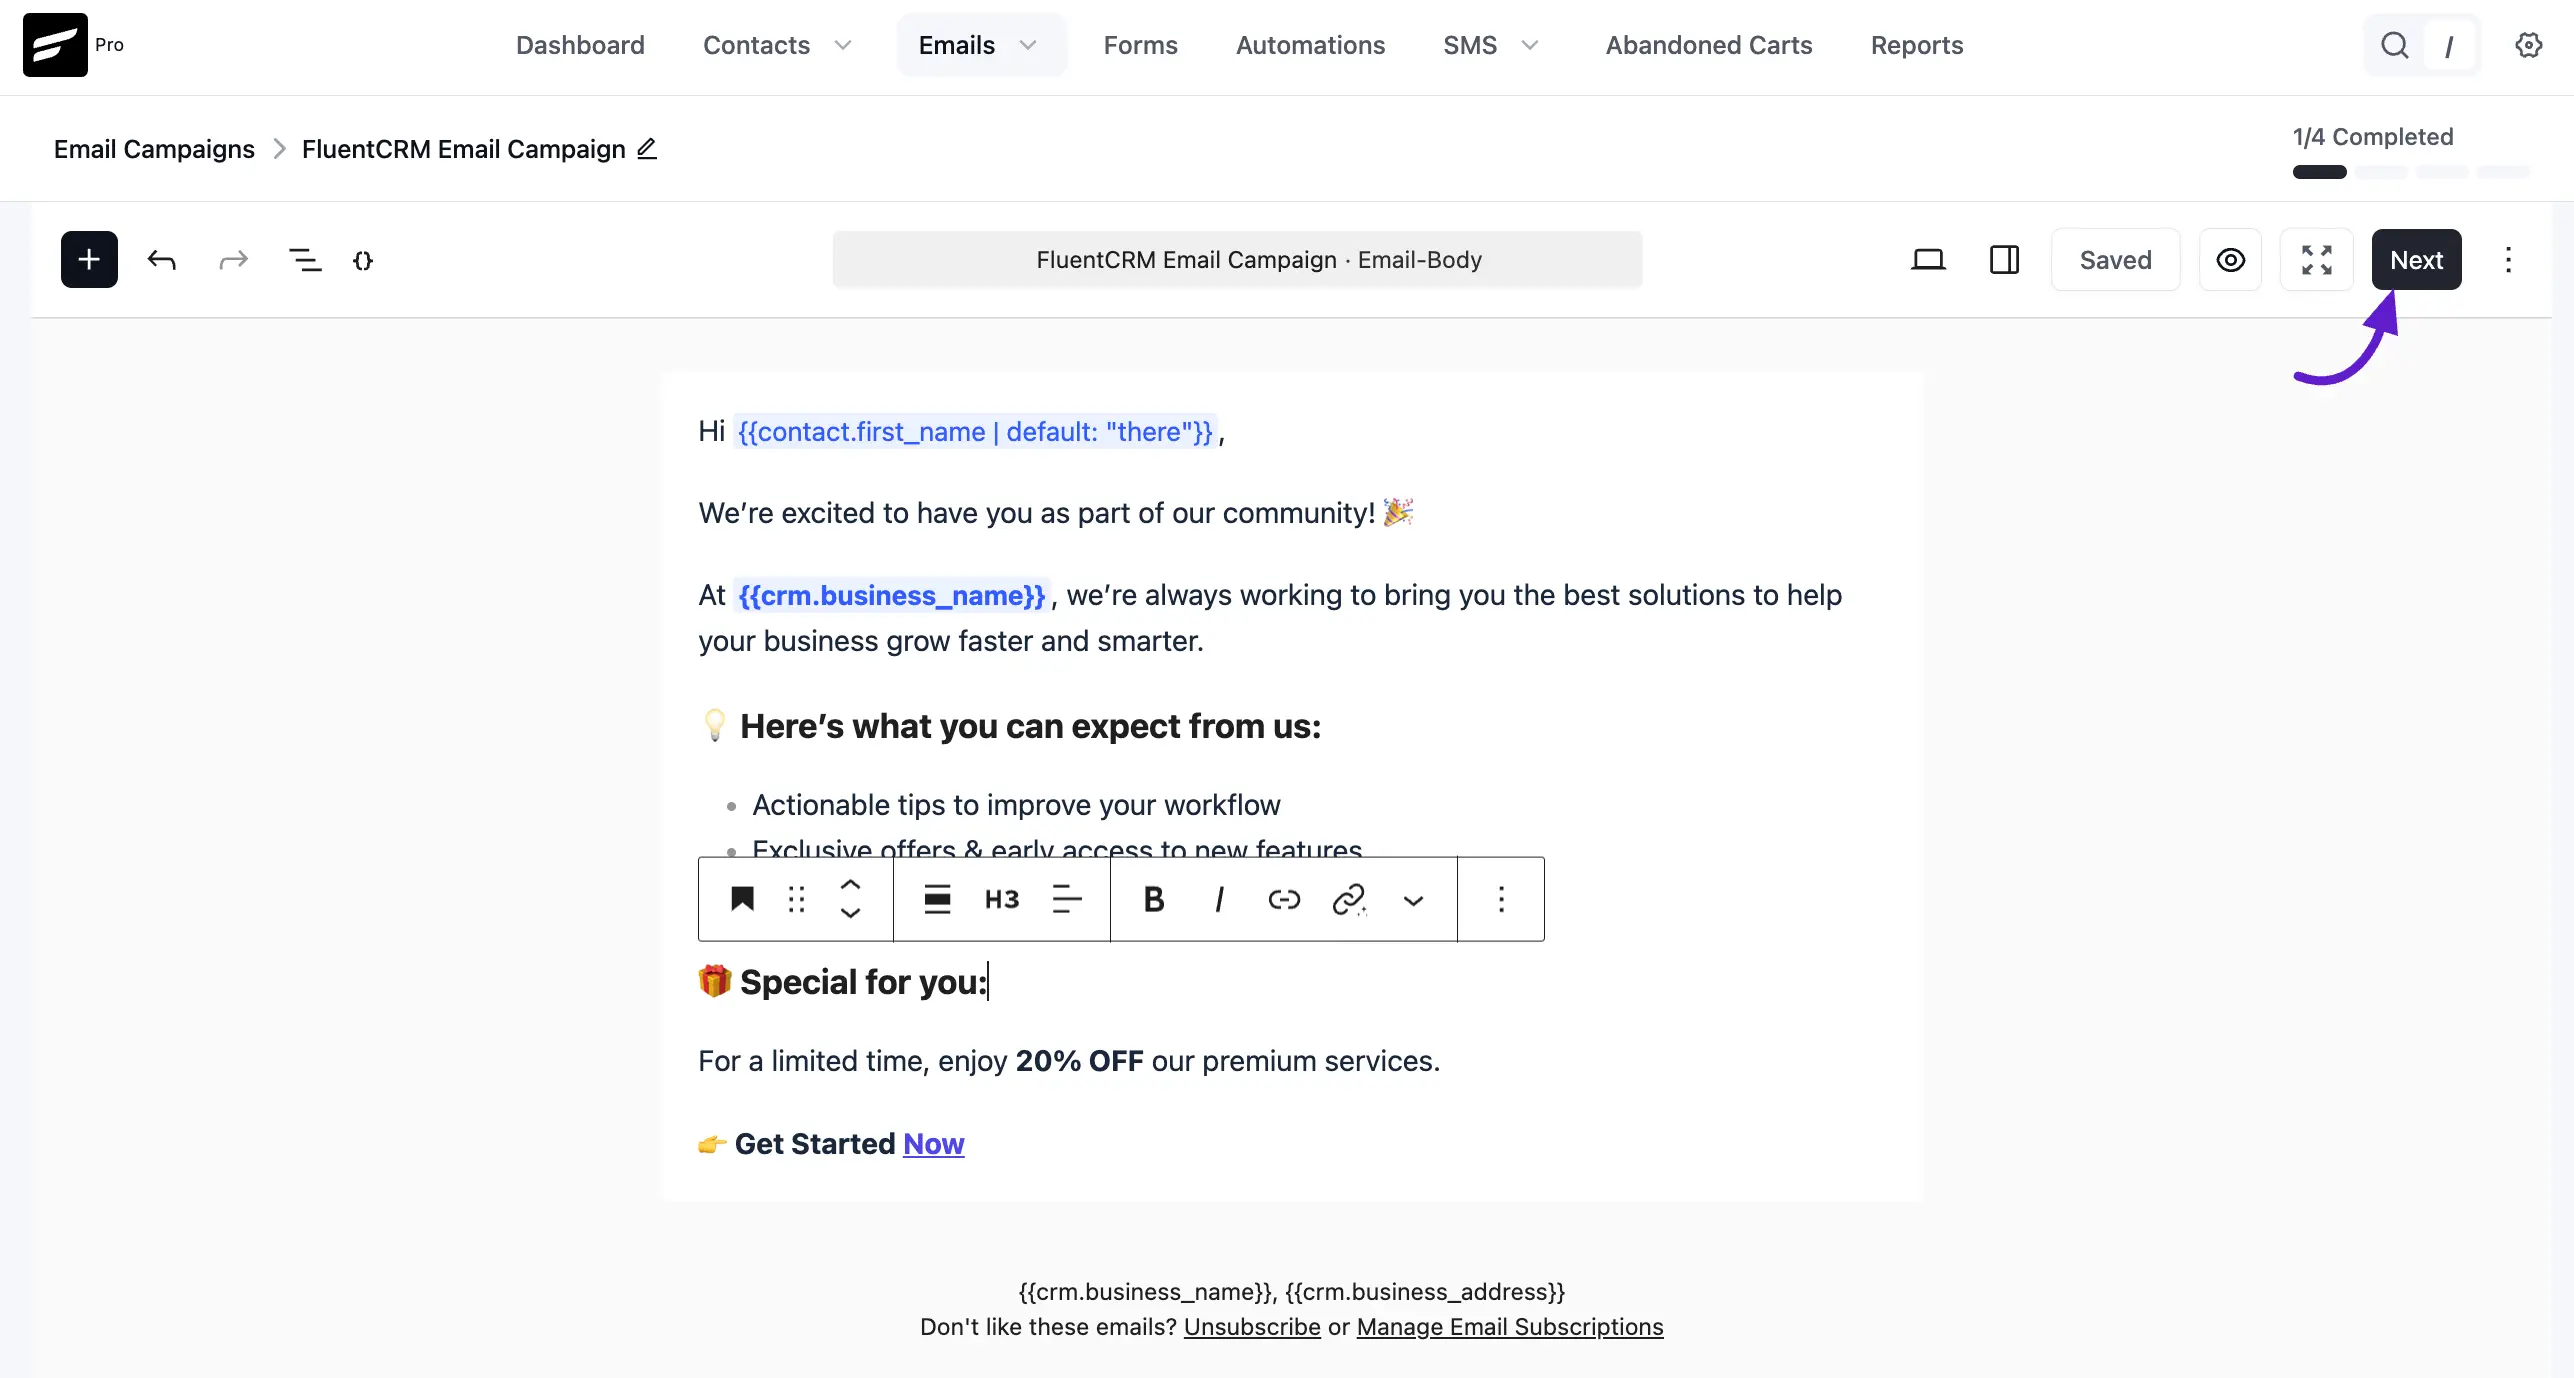
2. Compose Your Email
In the editor, you can start writing your content. You can use SmartCodes (like {{contact.first_name}}) to personalize the message for each recipient. Please check our Compose Email in FluentCRM to know a detailed guide about composing Emails in FluentCRM.
You can add images, buttons, and various text blocks to make your email engaging.
Once you are done manually composing the new Email Content or Importing an existing Email Template click the Next button at the top right.
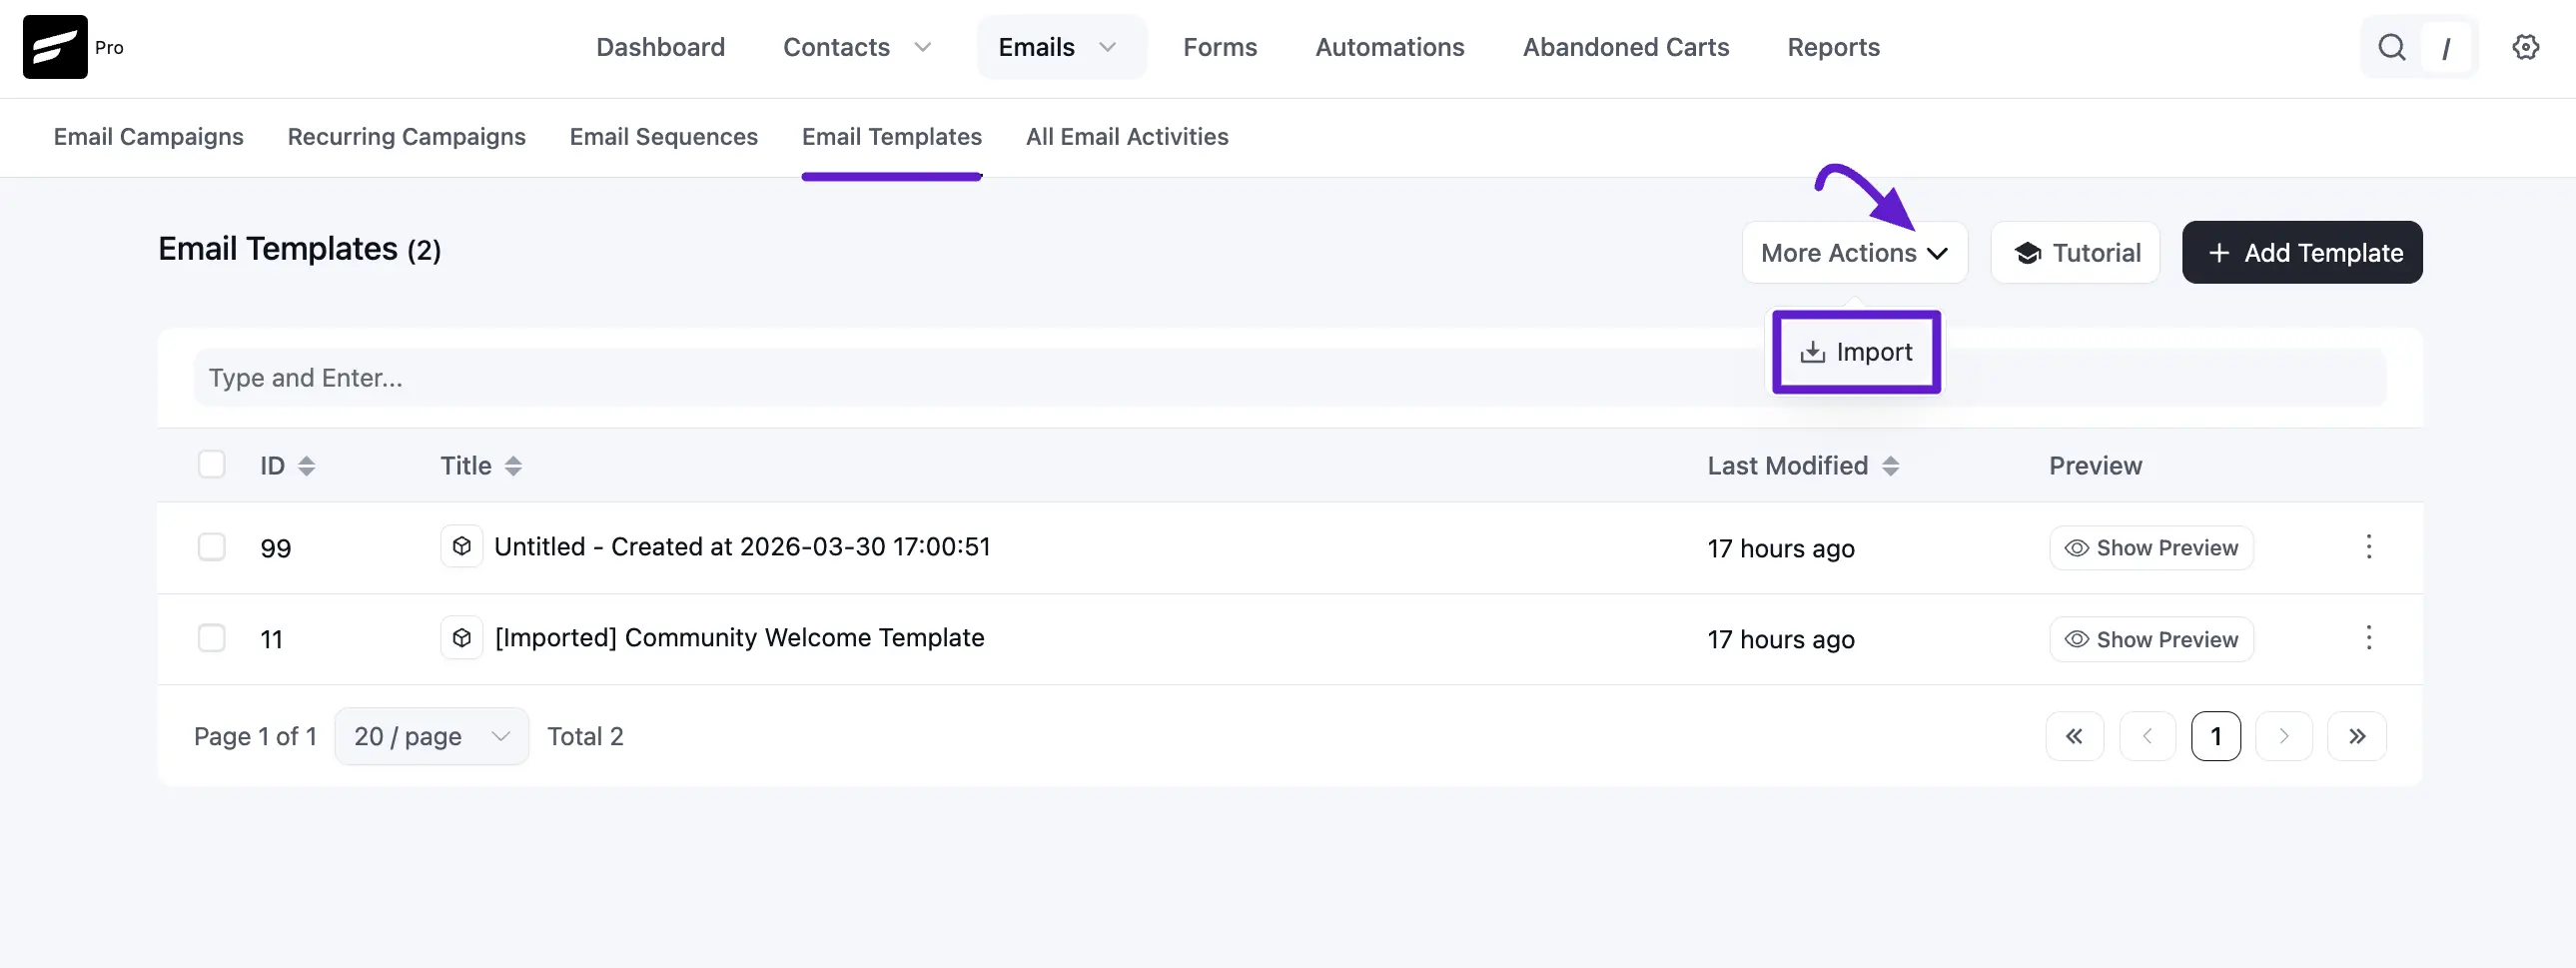
Import Existing Email Template
You can also use a premade or predesigned Email Template to use in the Email Campaign by Clicking on the Emails > Email Templates > More Action > Import button. To know more details about Email Templates please visit Email Templates in FluentCRM.
3. Subject & Settings
In this section, you will work on the various components of your email Subject & Settings. This step defines the Email Campaign settings that are mostly technical and very important parts of Email Marketing.
Email Subject & A/B Testing
In the Subject field, enter a subject line for your email. The subject plays a very important role in whether the email will be opened by a user or will just ignore the email.
You can Enable A/B testing to try different subject lines. Also, you can add multiple subjects for A/B testing. This will help you determine which subject is working best for your emails by checking the A/B test result.
You can set a Priority (%) for each version; the system will send the variations to a portion of your list to see which performs best.
NOTE
The available data properties are discussed in the SmartCode in Email Editor.
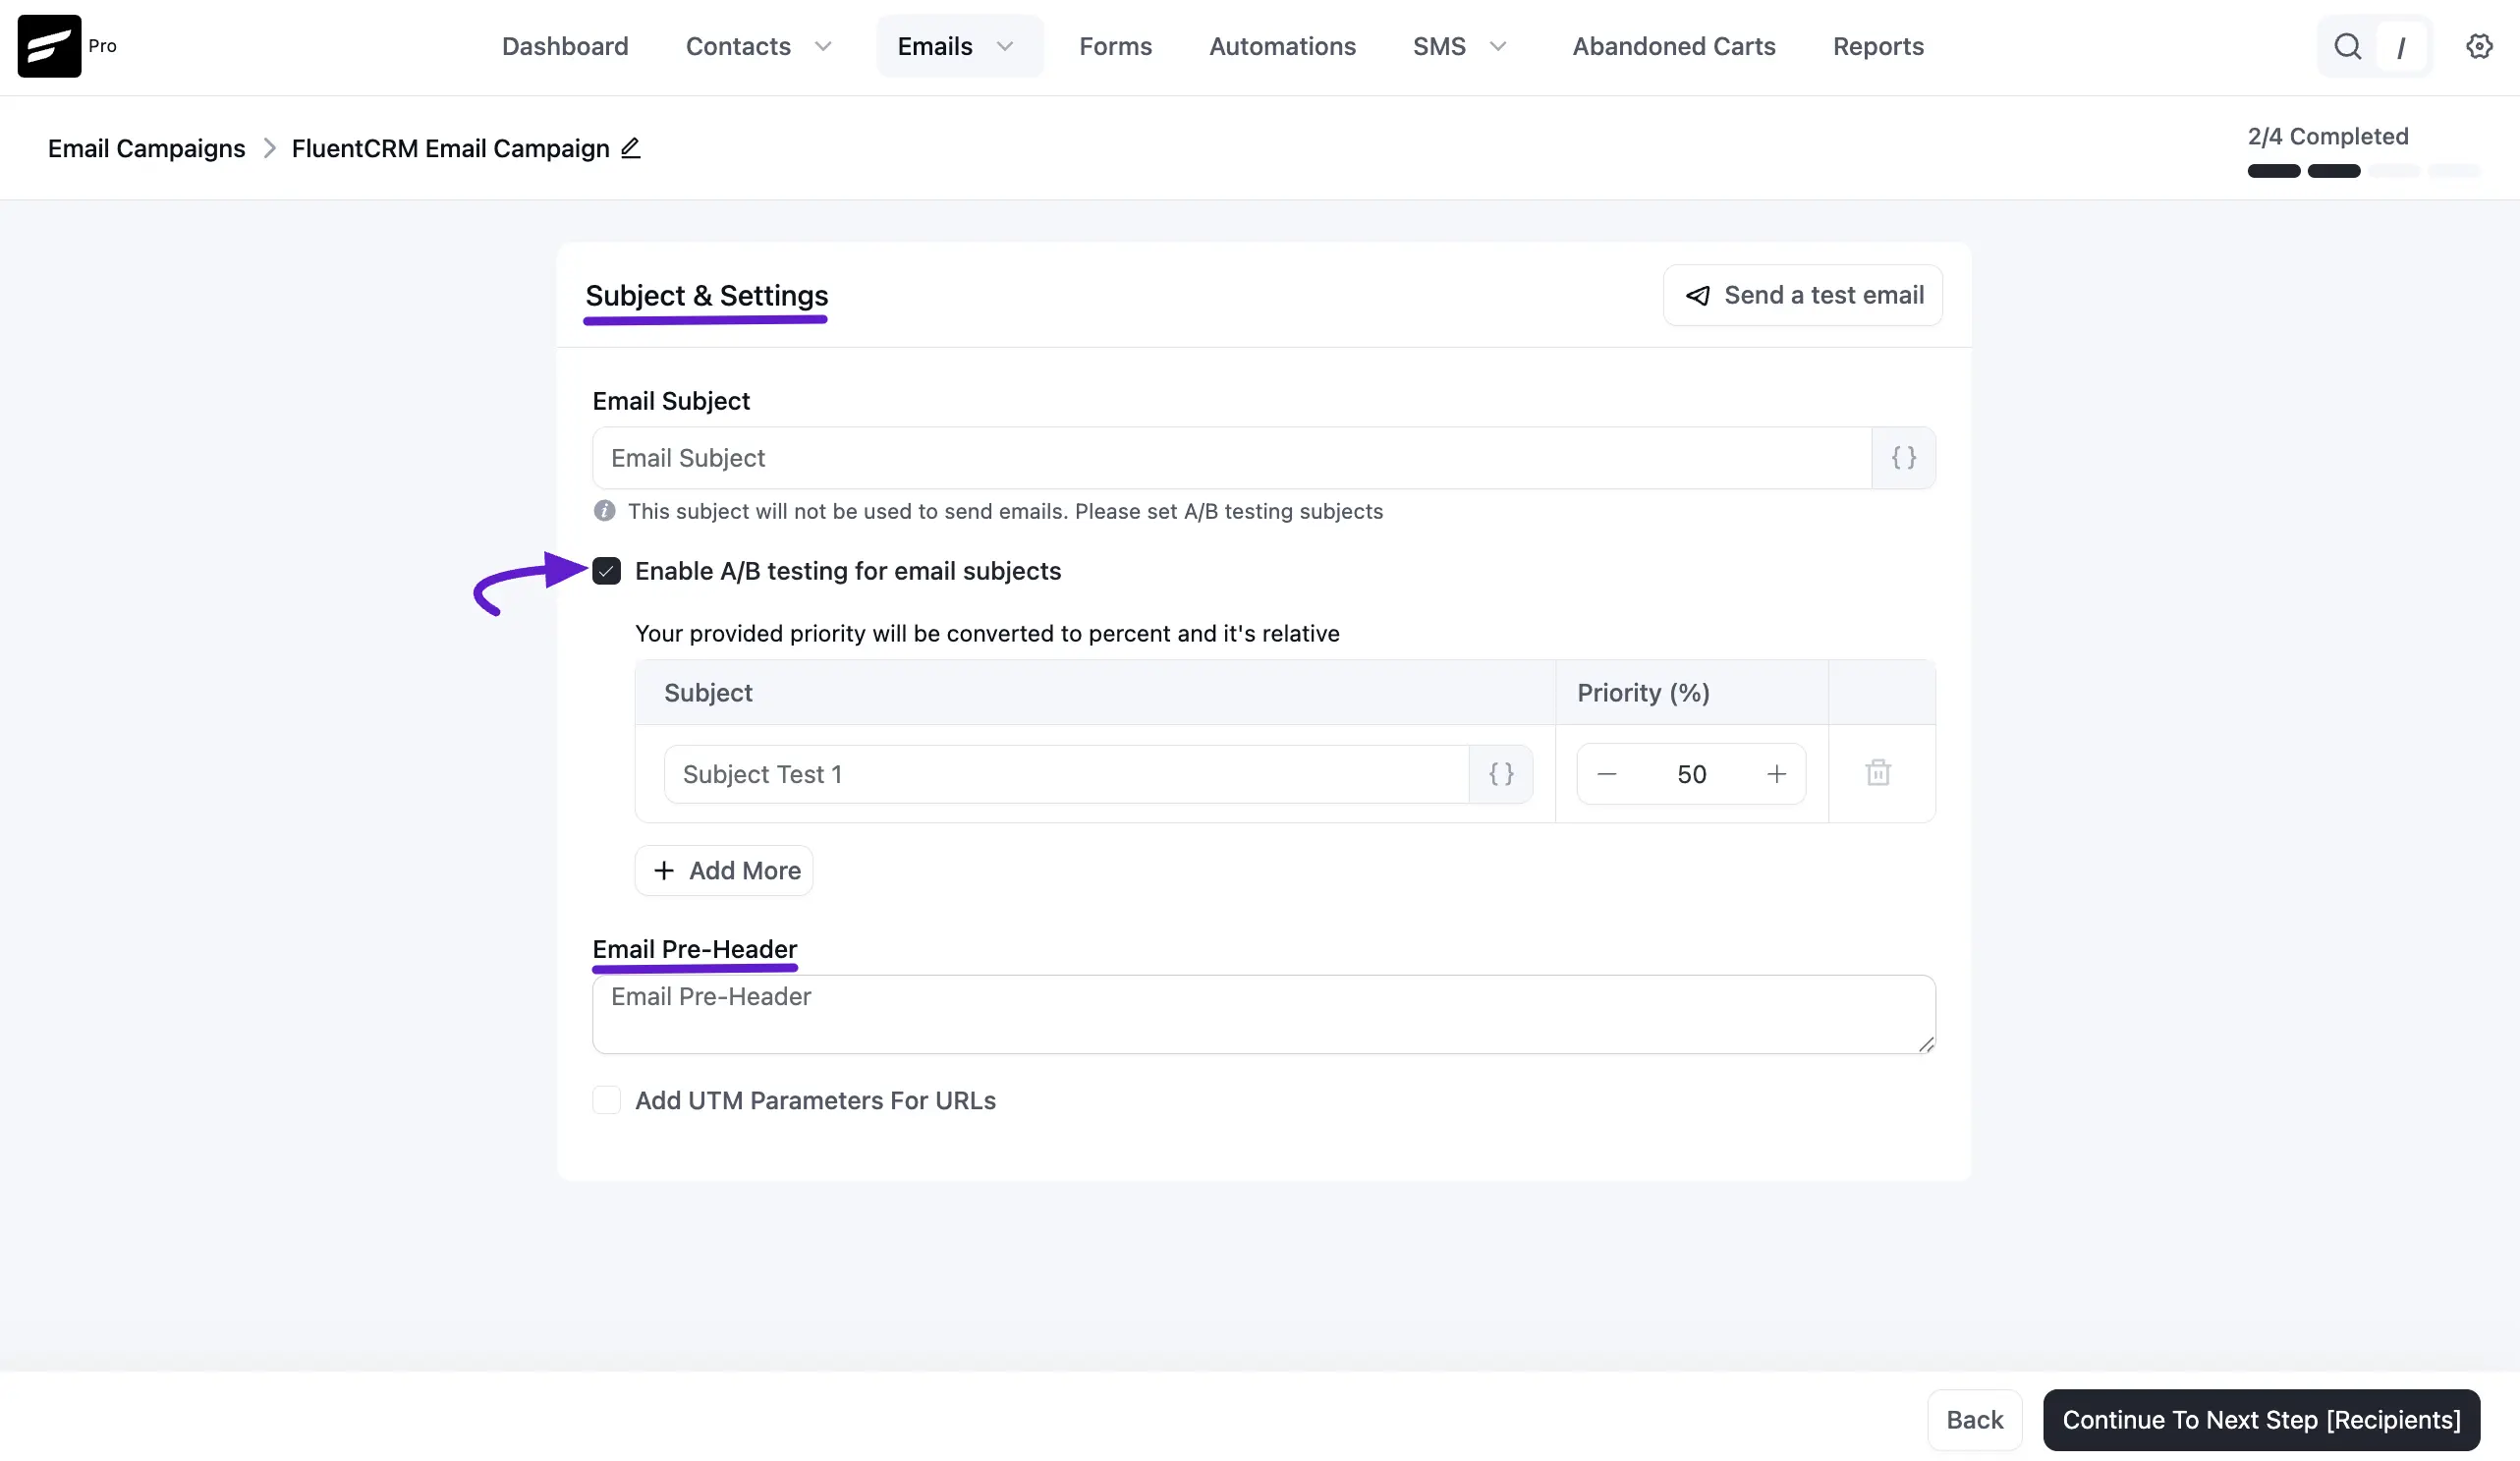
Email Pre-Header
This is the "hook" text that appears next to the subject line in an inbox.
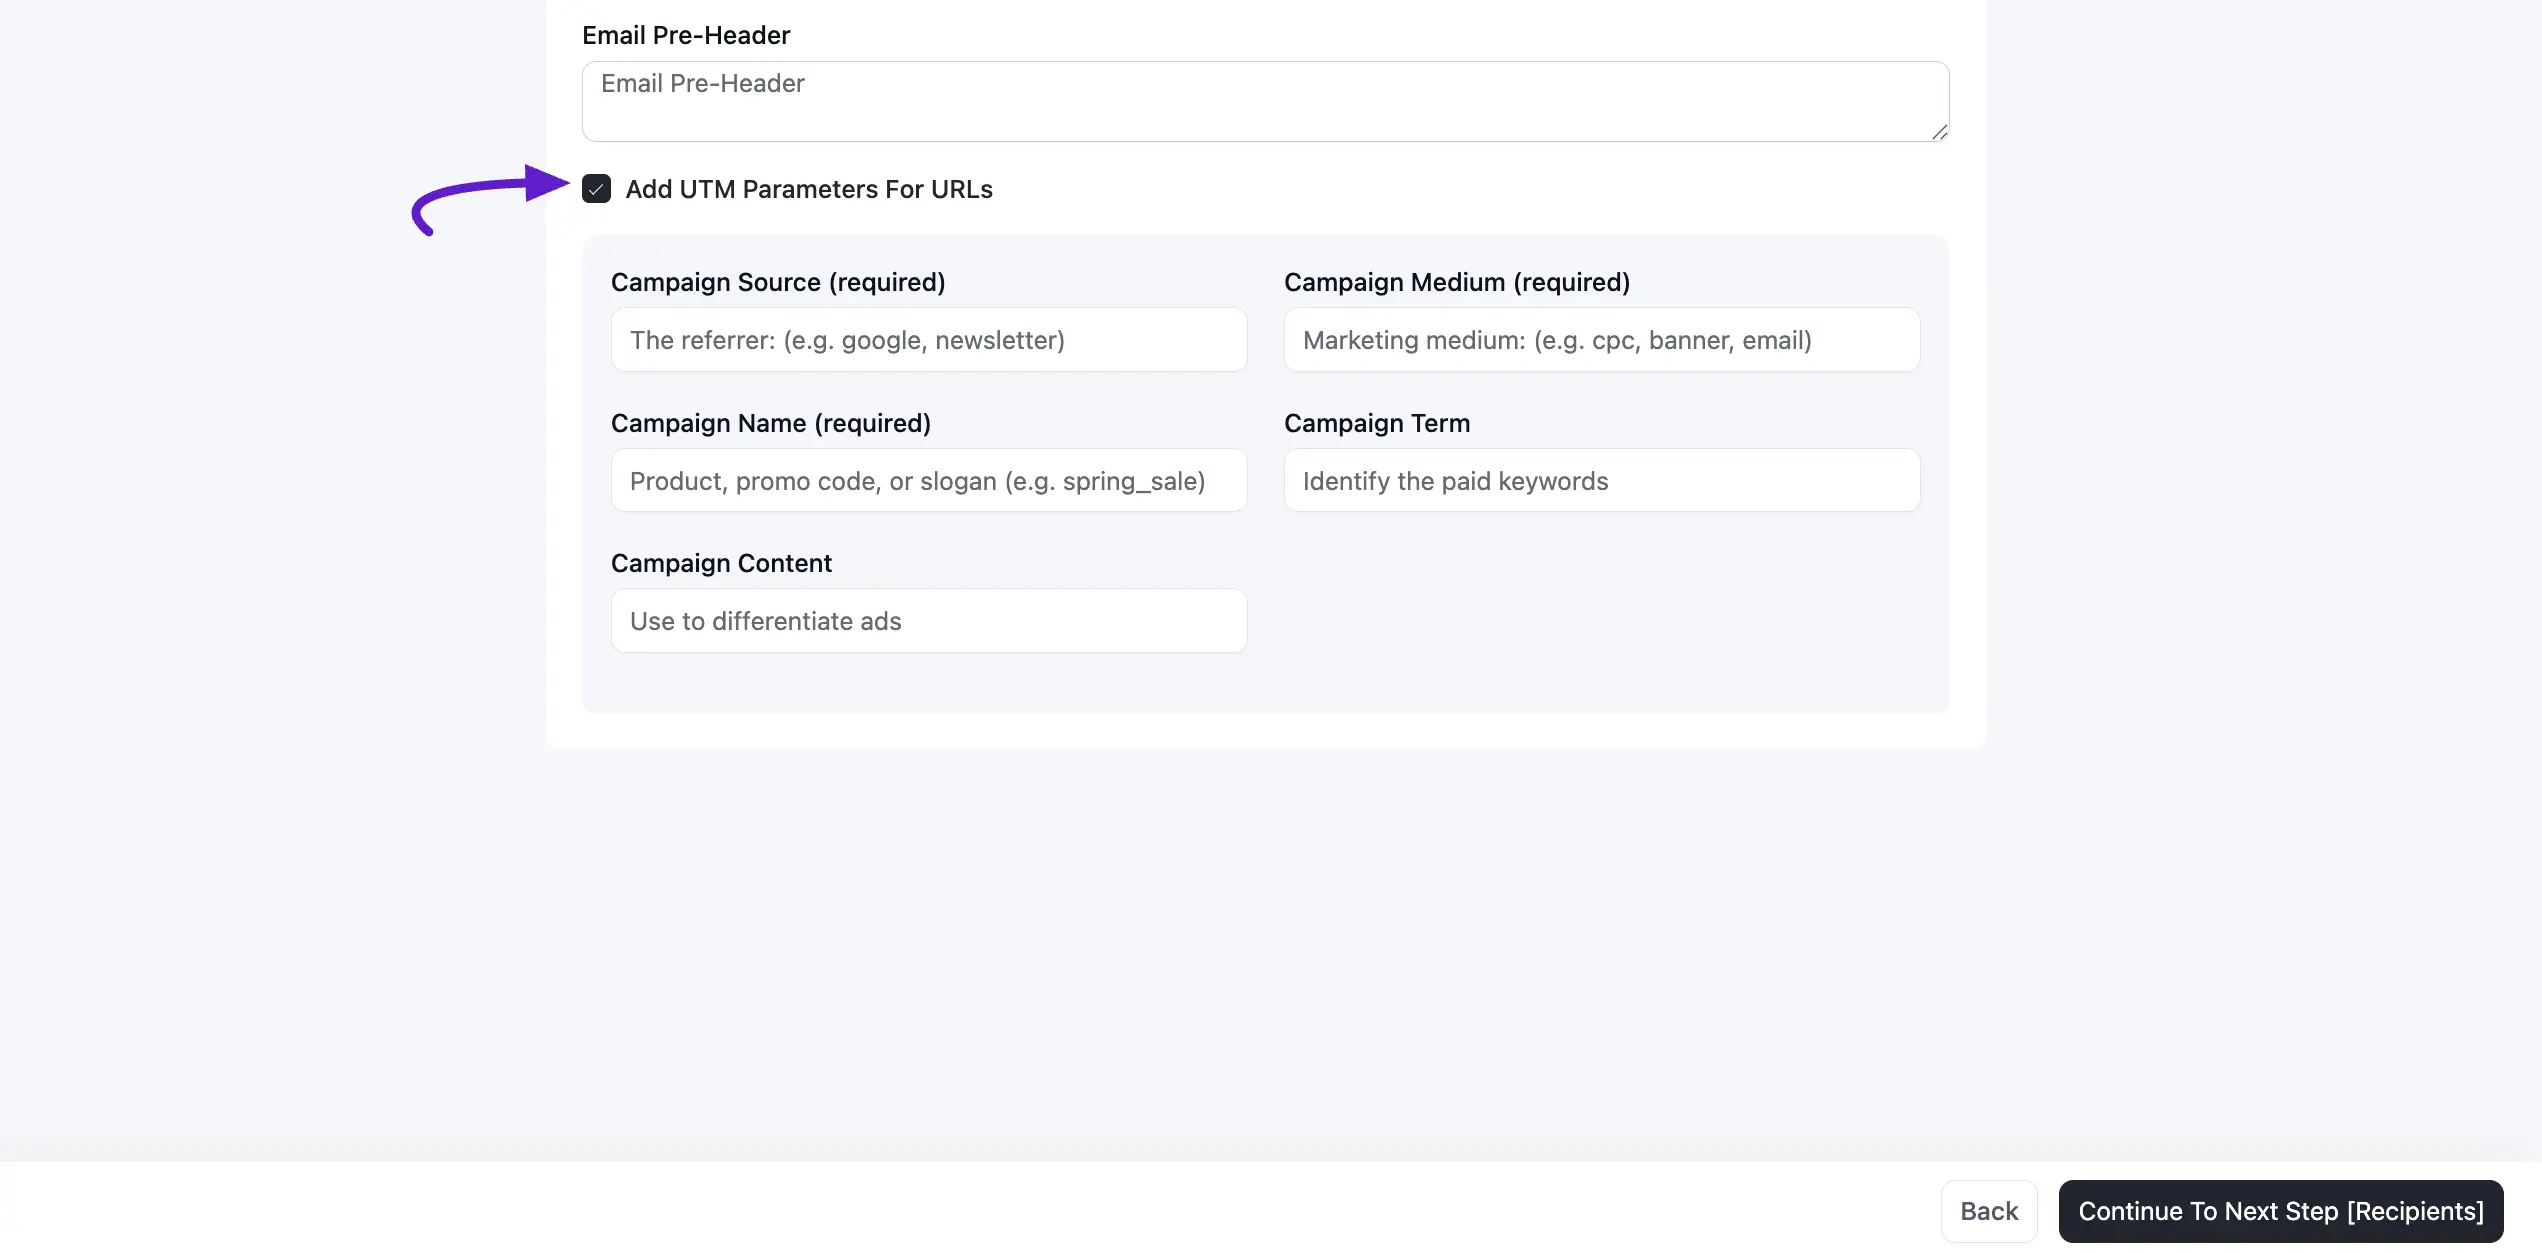
UTM Parameters
Click the checkbox to add UTM parameters to every URL in the email: Campaign Source, Medium, and Campaign Name are required, while Campaign Term and Content are optional. This allows you to see exactly which campaign drove traffic in tools like Google Analytics.
New in v3: Once a campaign is sent, the UTM tags you applied are visible in the campaign's Details tab and shown next to each tracked link in the Link Activity report. This makes it easy to confirm what was tagged after the fact – see Campaign Summary & Actions for the full report.
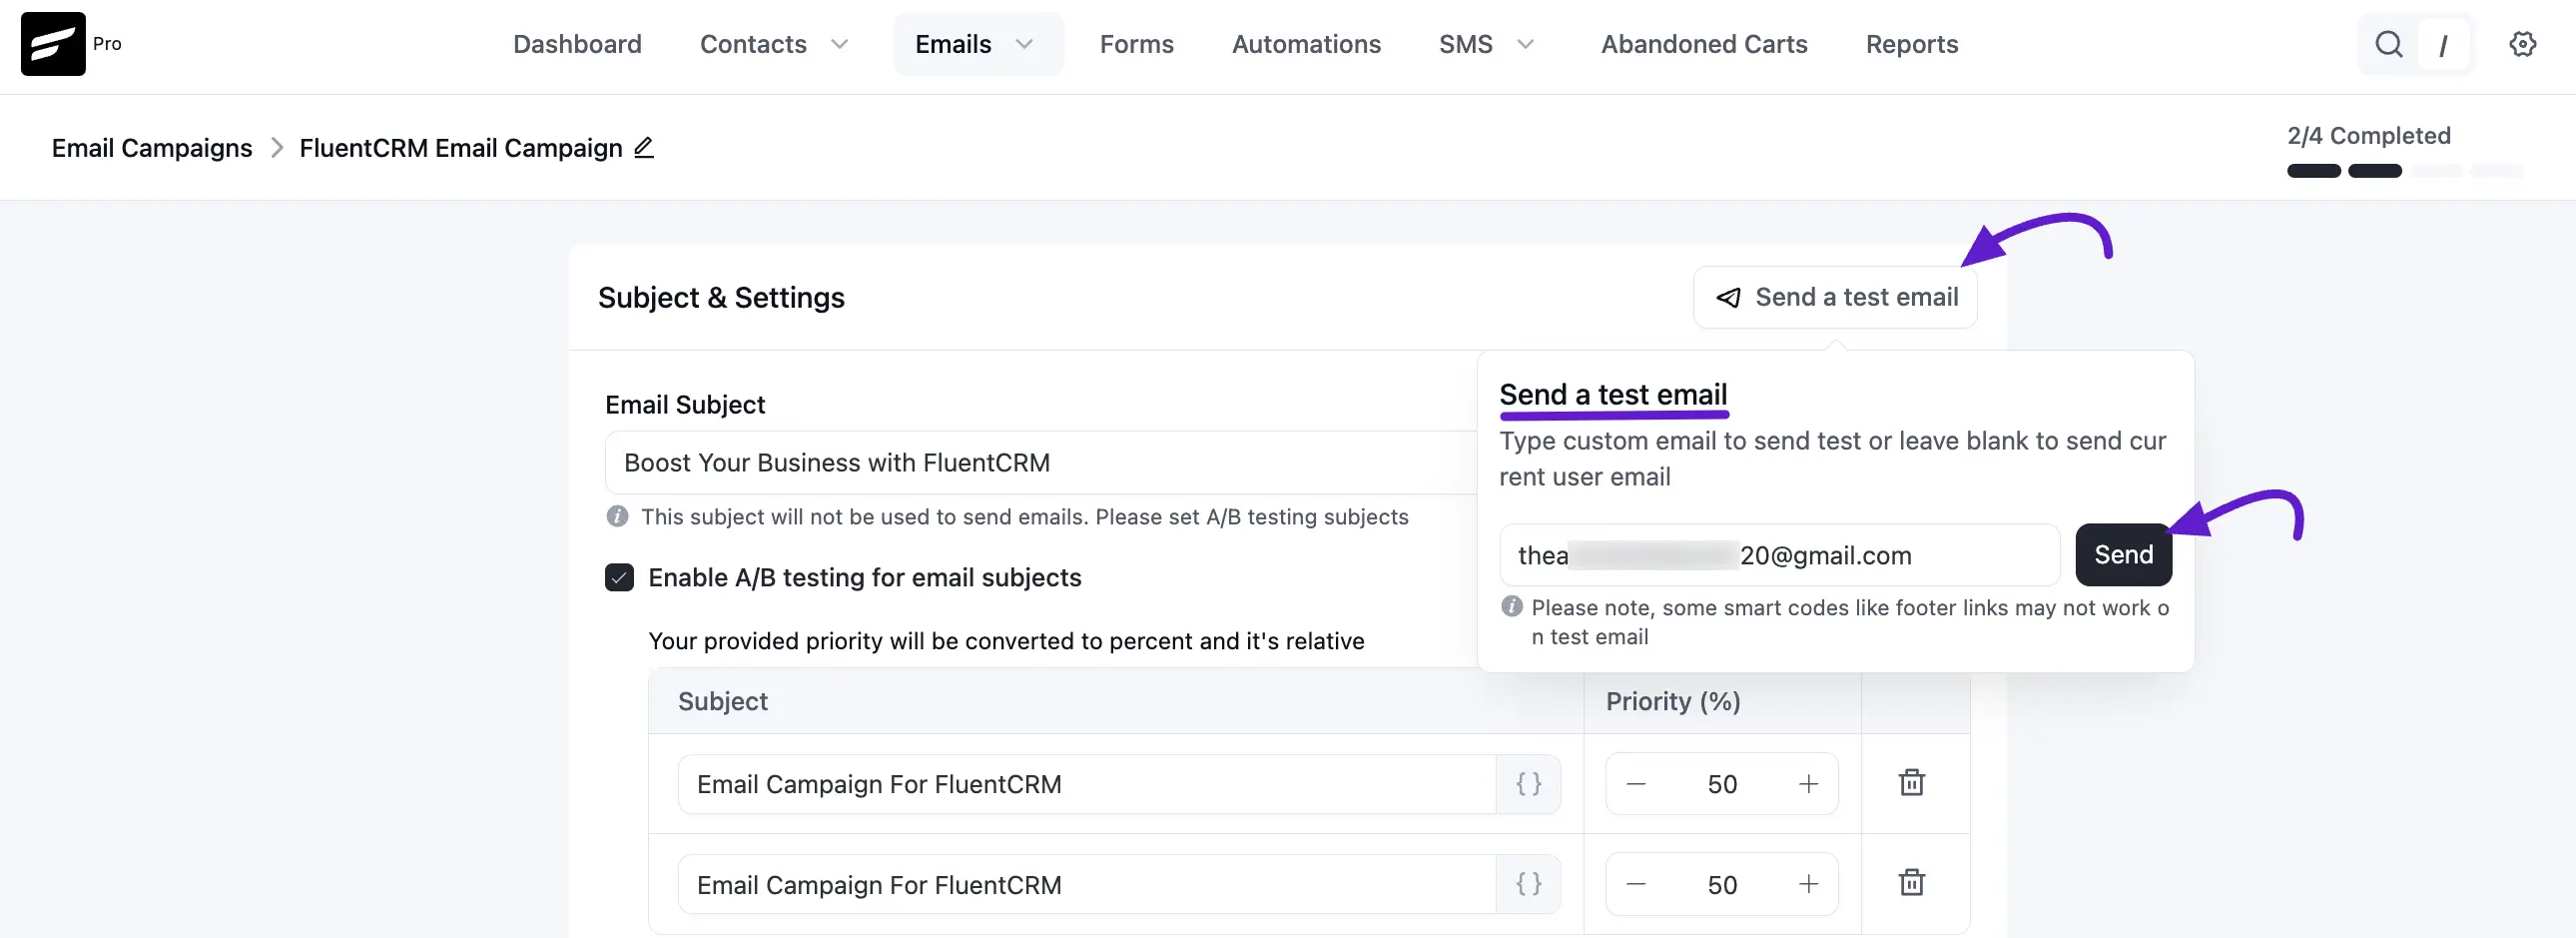
Send a Test Email
When you are done with all the fields of Subject & Settings, you can send a test email to your mailbox.
To send a test email from Email Campaigns, click the Send a test email button and input the email address where you want to receive the test email and click on the Send button as shown in the below screenshot.
Once the email is sent successfully you will see a Success Message saying the Test email is sent successfully. on the top right corner. Click Continue To Next Step [Recipients] to proceed.
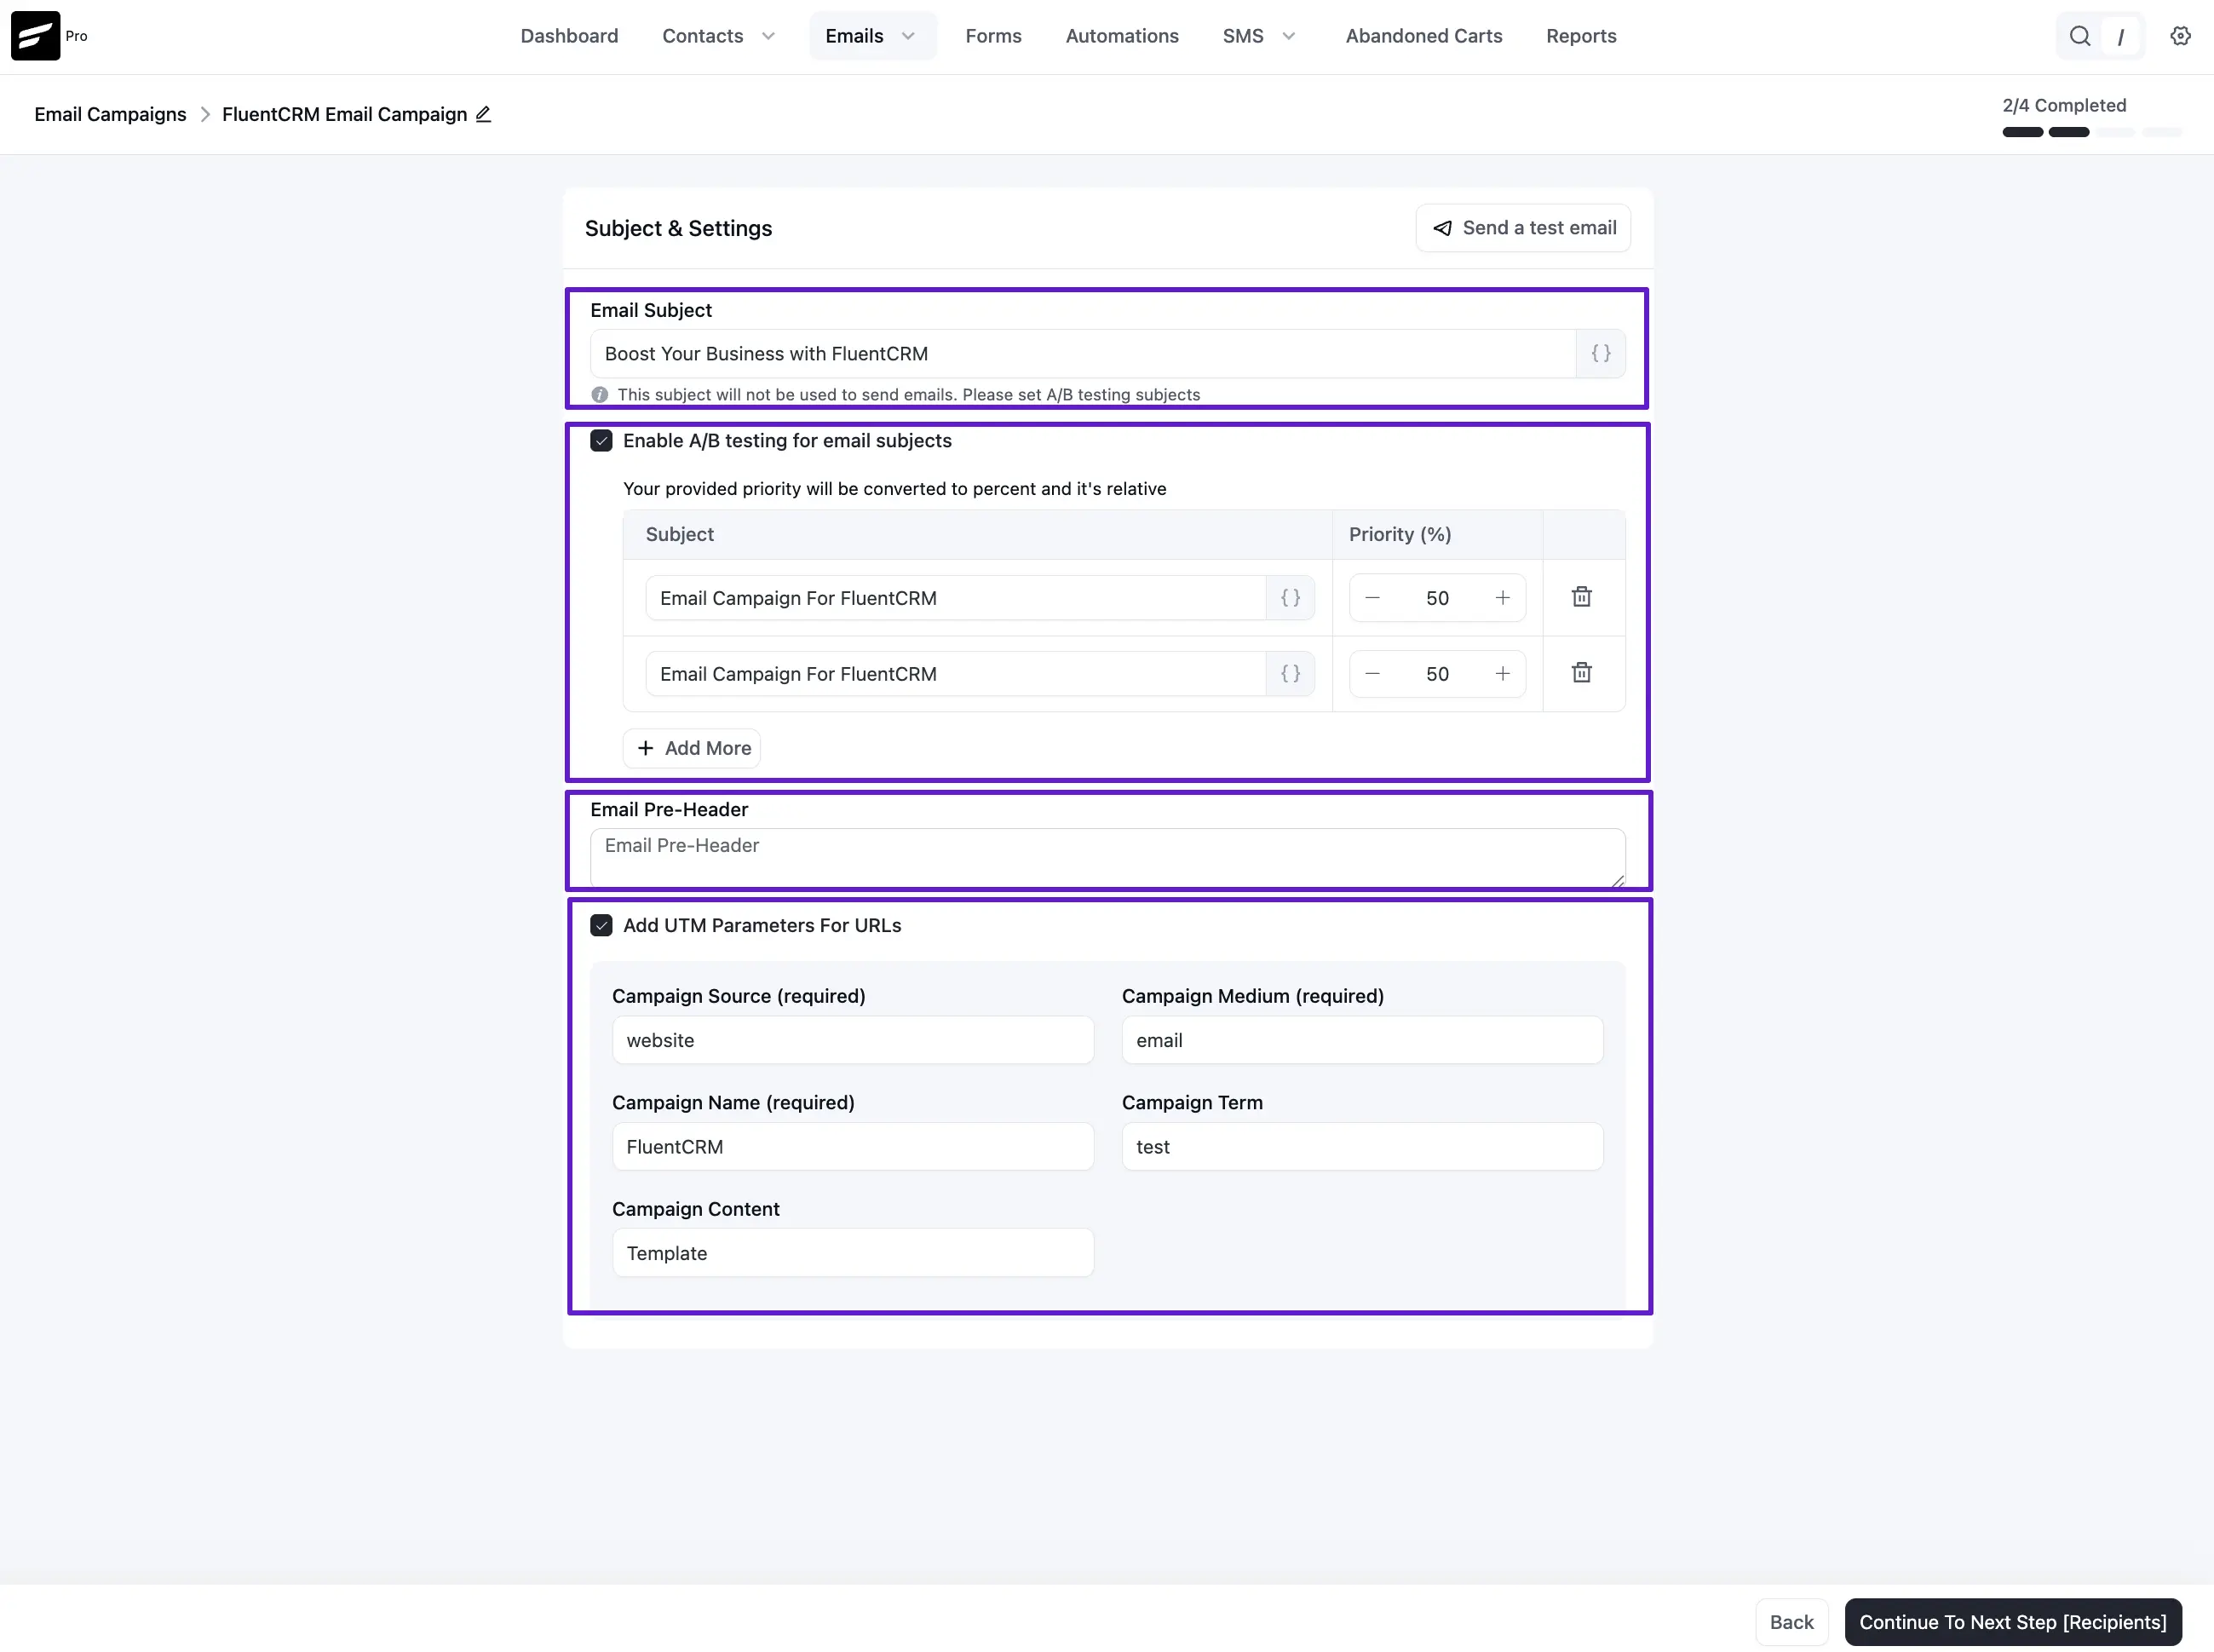
Full Overview of Subject & Settings
Once you have configured all of the above depending on your requirements, you will see the options as below. You may leave any of the options if you do not wish to use or set them. But an Email Subject is required.
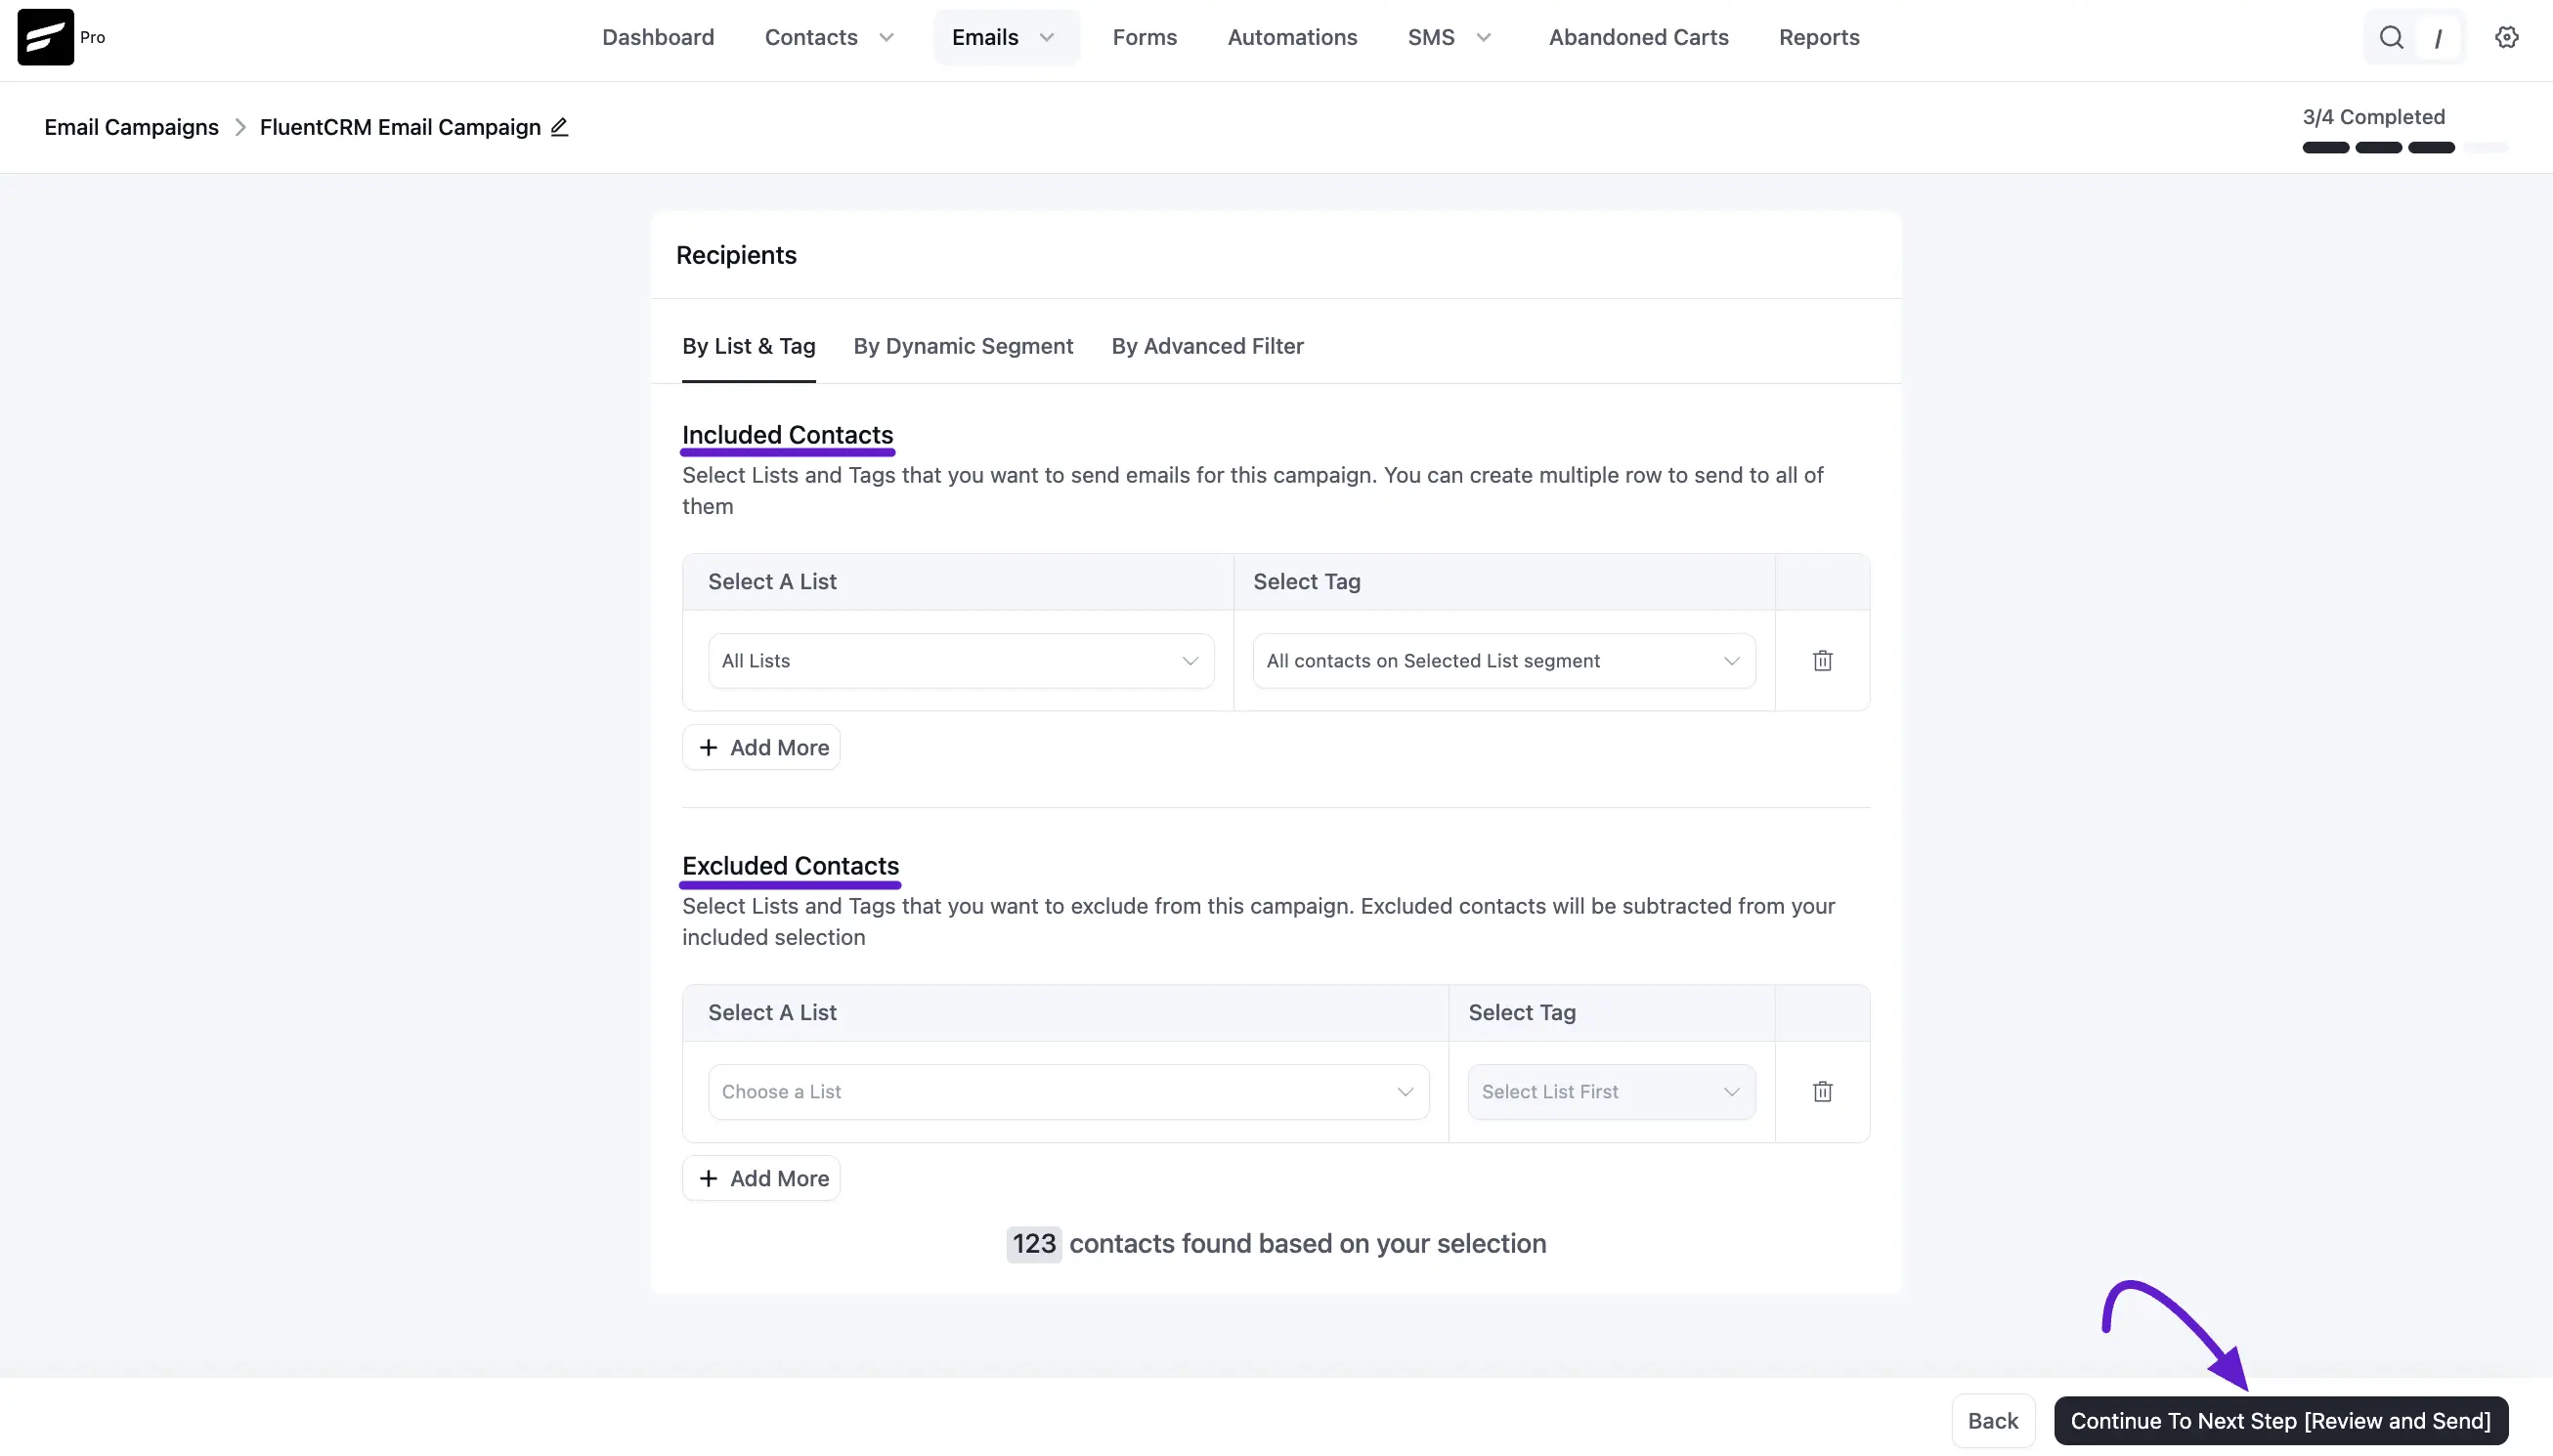
4. Selecting Recipients
Now, define exactly who should receive this campaign. You can filter your audience using three methods:
- By List & Tag,
- By Dynamic Segment and
- By Advanced Filter.
By List & Tag
Choose your List & Tag. You can select one list and one tag from the dropdown. To use multiple Lists and tags Please click on the + (Plus) icon or - (Minus) icon to remove any of them. You can also exclude contacts from the campaign based on a certain List and Tag.
By Dynamic Segment
You can also run the campaign by dynamic segments, for example, WooCommerce Users or LearnDash, LifterLMS users, or any other dynamic segments you created in FluentCRM. Please visit the General & Dynamic Segments documentation to know more details.
By Advanced Filter
You can select custom contacts by using Advanced Filter and filter the contacts accordingly. This is a wide conditional section based on various Data Properties for Contacts and Activities inside FluentCRM.
The system will show you the total number of contacts found based on your selection at the bottom of the page. Click Continue To Next Step [Review and Send].
Recipients Processing
Depending on your selection or the number of contacts the recipients of the email campaign will now be processed. You may not see this screen for only a few contacts. But if the recipients are too high in the number you may see a processing window like the below screenshot. It also depends on the website server resources like CPU, and MEMORY allocated to the website.
Once you are done choosing the Recipients, click continue to the Review & Send step.
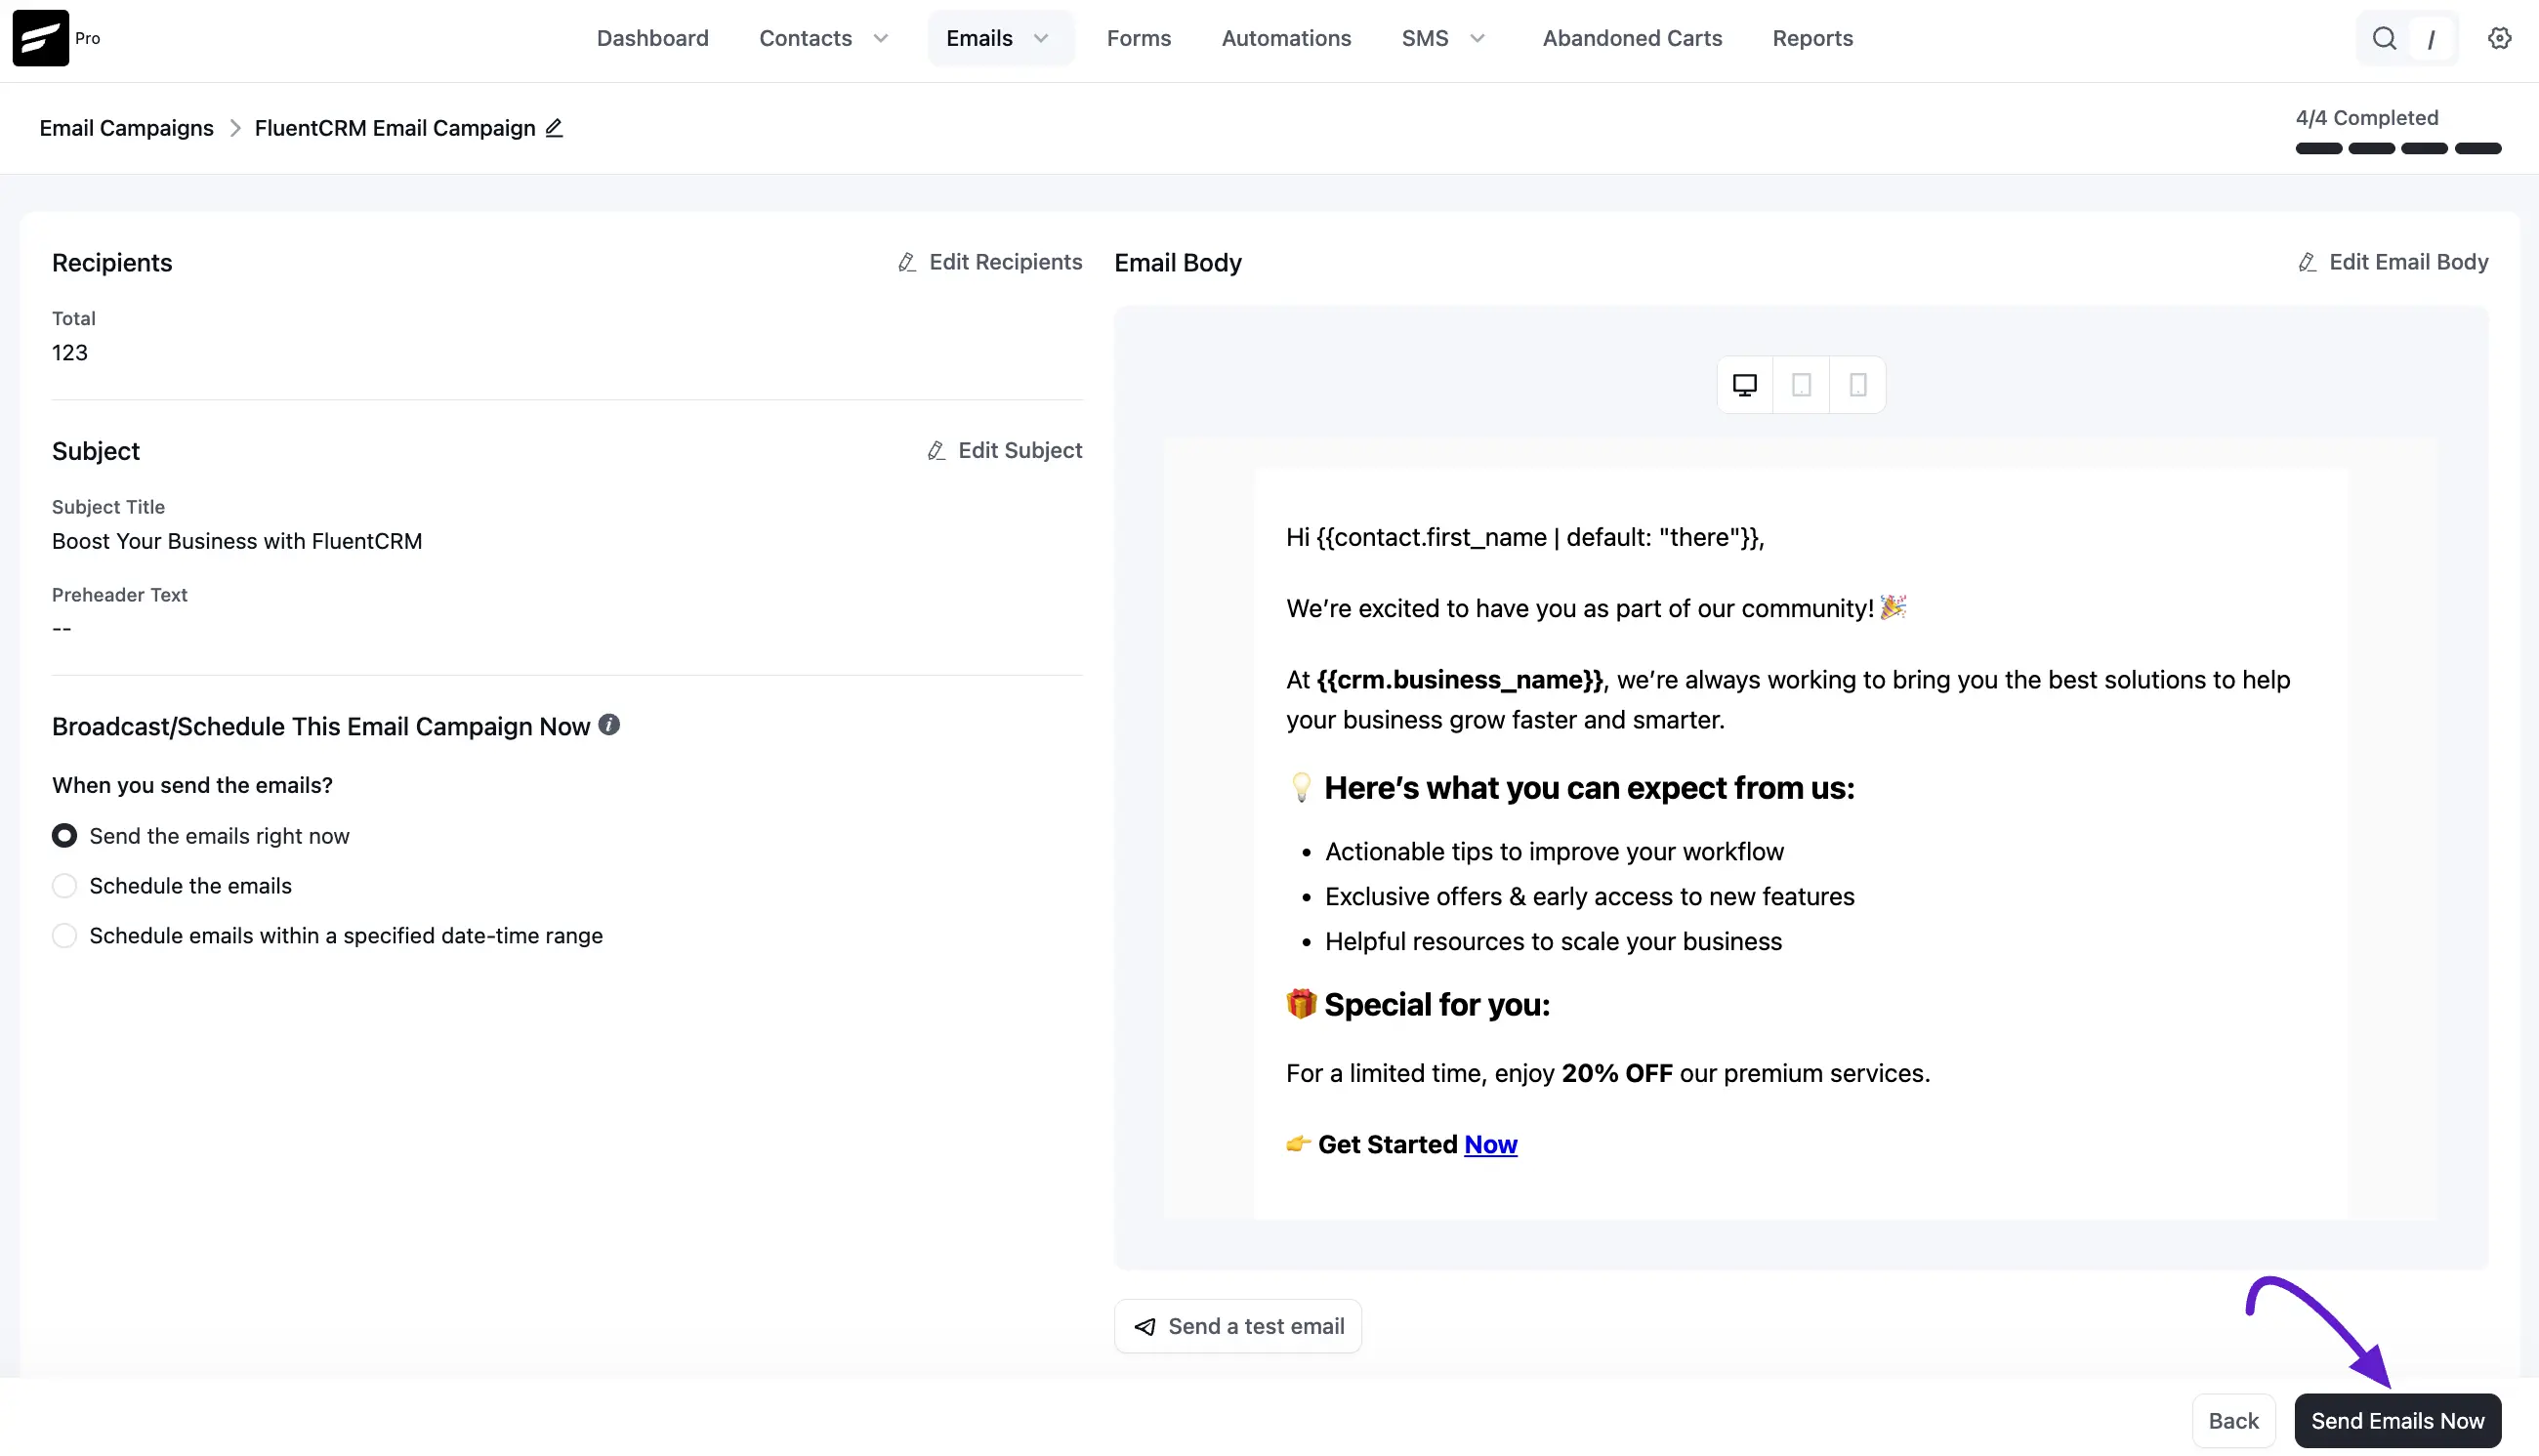
5. Review & Send
The final screen provides a full summary of your campaign. Review your Subject, Pre-header, Recipient count, and Email Body one last time.
If anything needs to change you can go back and edit. If everything has been set up correctly you can start the campaign right away.
Send the Email Right Now
Now when you are done with all the previous settings, you can either send the campaign immediately or schedule it discussed in the later section.
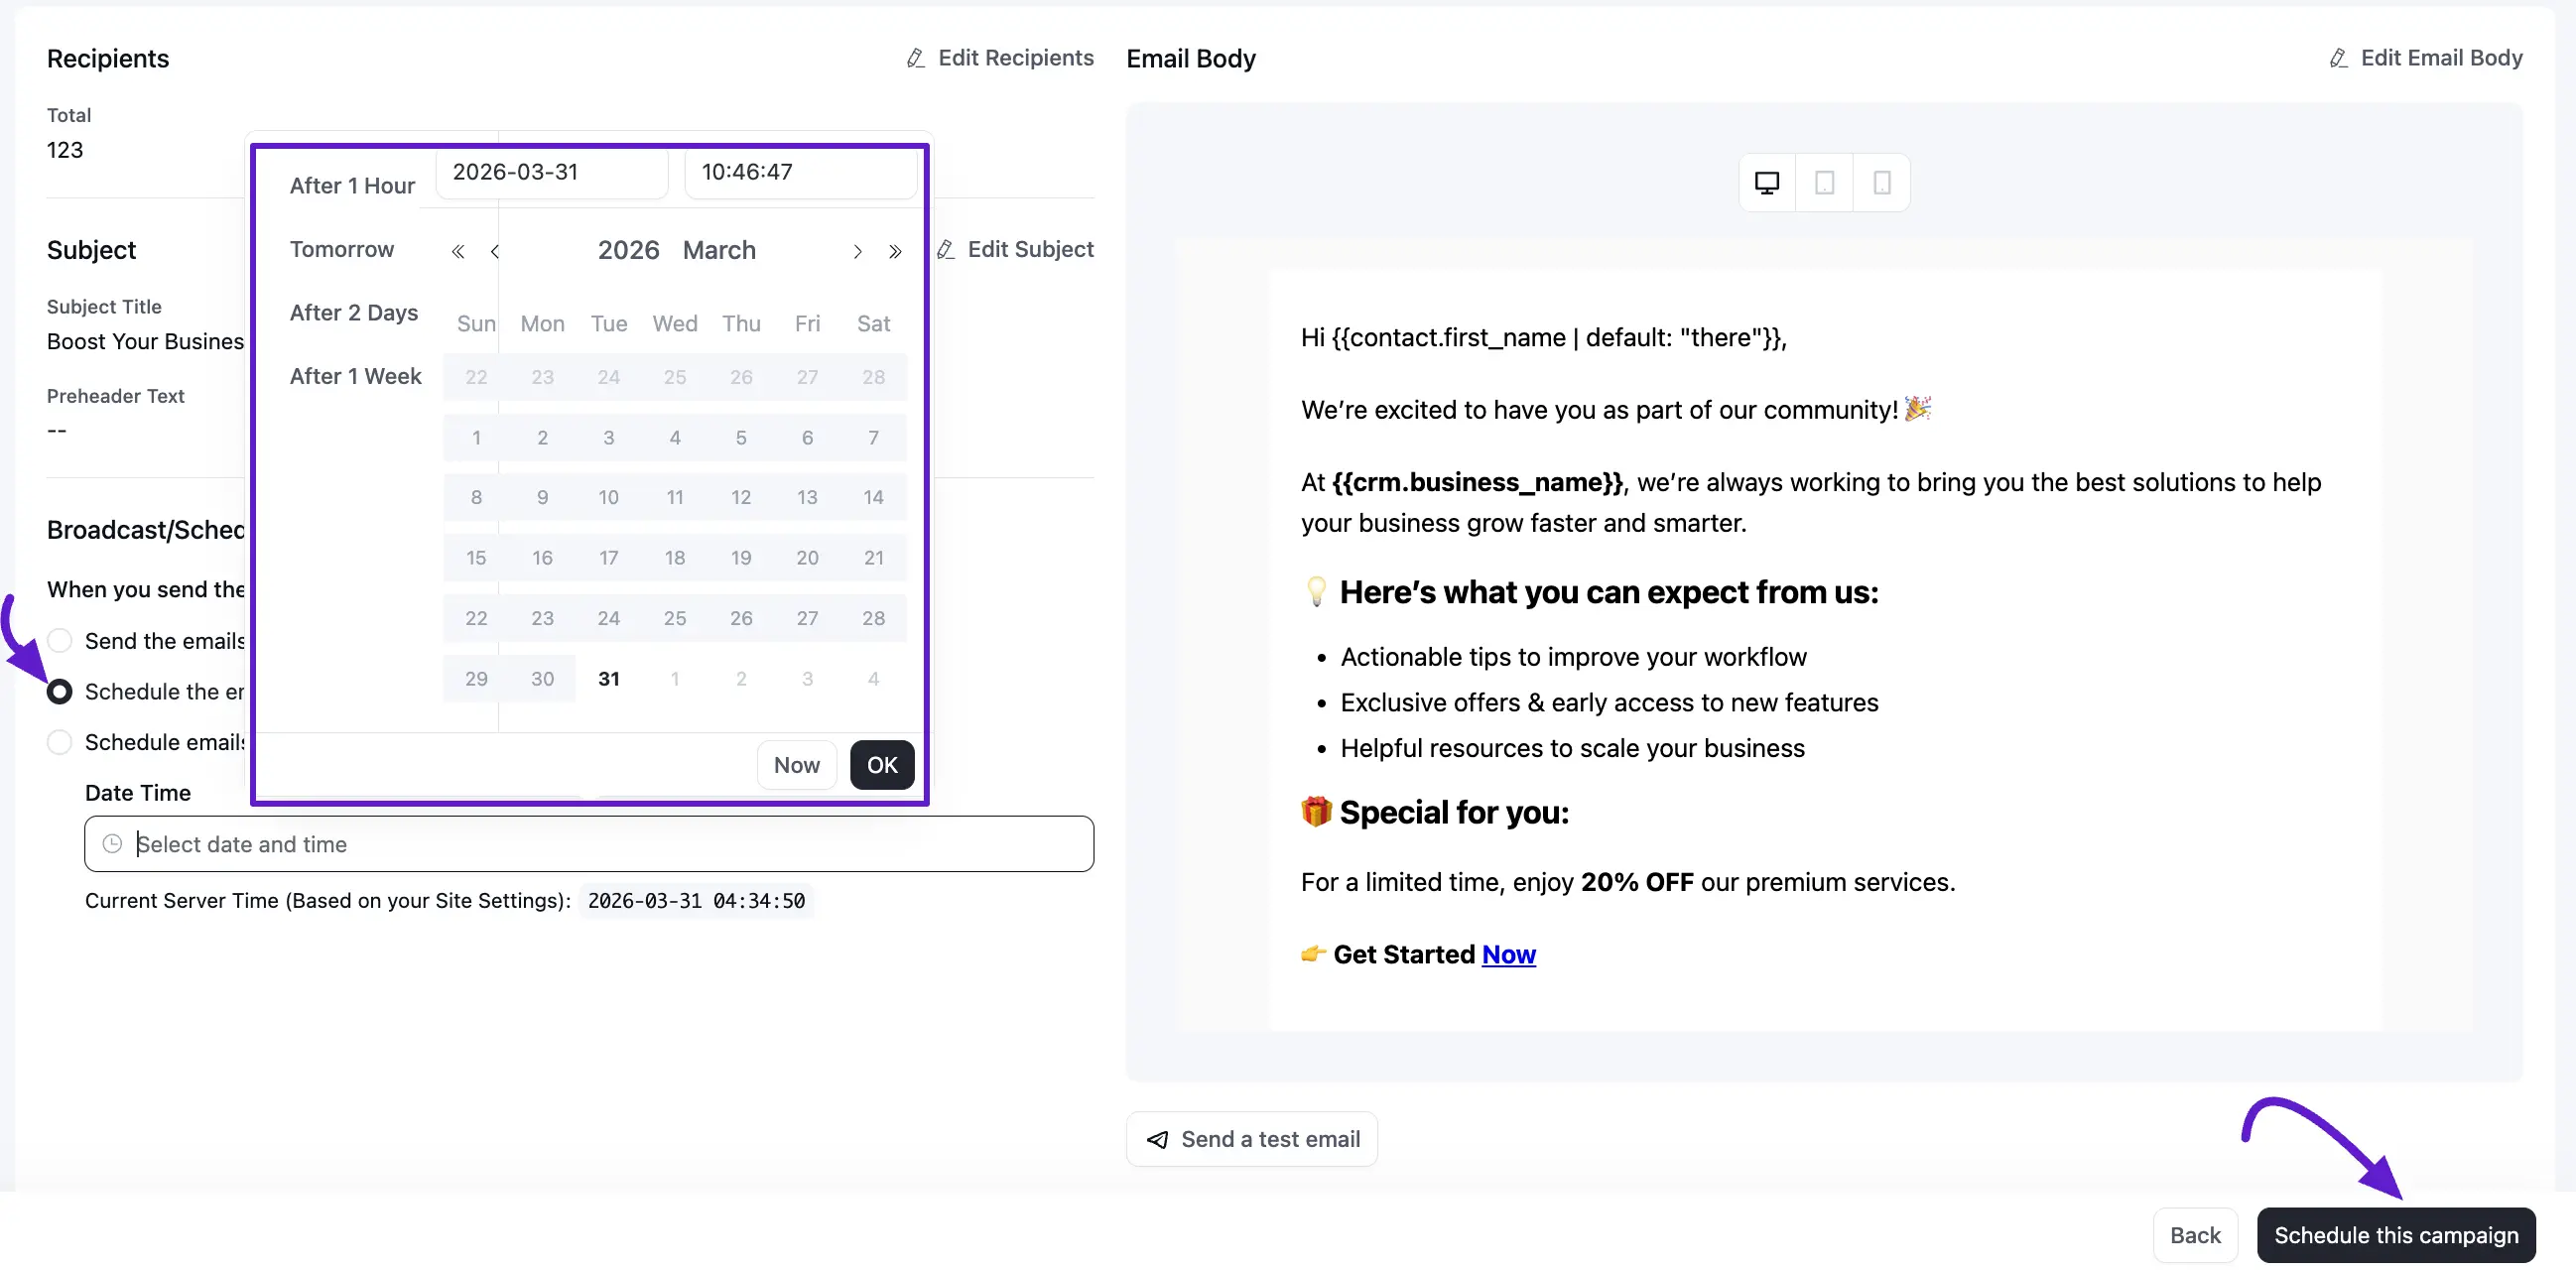
Schedule Campaign
You can schedule the campaign also by selecting the date and time. You will be able to schedule it After 1 Hour, Tomorrow, After 2 days, and After 1 Week as a built-in option on the left of the calendar.
The Send the Email Right Now button will work as the immediate sending as the previous option. Please make sure to compare the time according to your needs with the WordPress Time settings. You will also be able to see the Current Server Time defined in the WordPress Settings.
Once satisfied, click Send Emails Now (or Schedule this campaign).
Campaign Delivery
Once you start sending immediately you will see a screen similar to the below screenshot. It will show you the Number of:
- Pending Emails: The number of remaining emails to be processed and sent.
- Processing Emails: The number of emails processing or in the memory to be sent.
- Sent Emails: Already sent or delivered emails to recipients.
- Total Emails: The total recipients for the campaign.
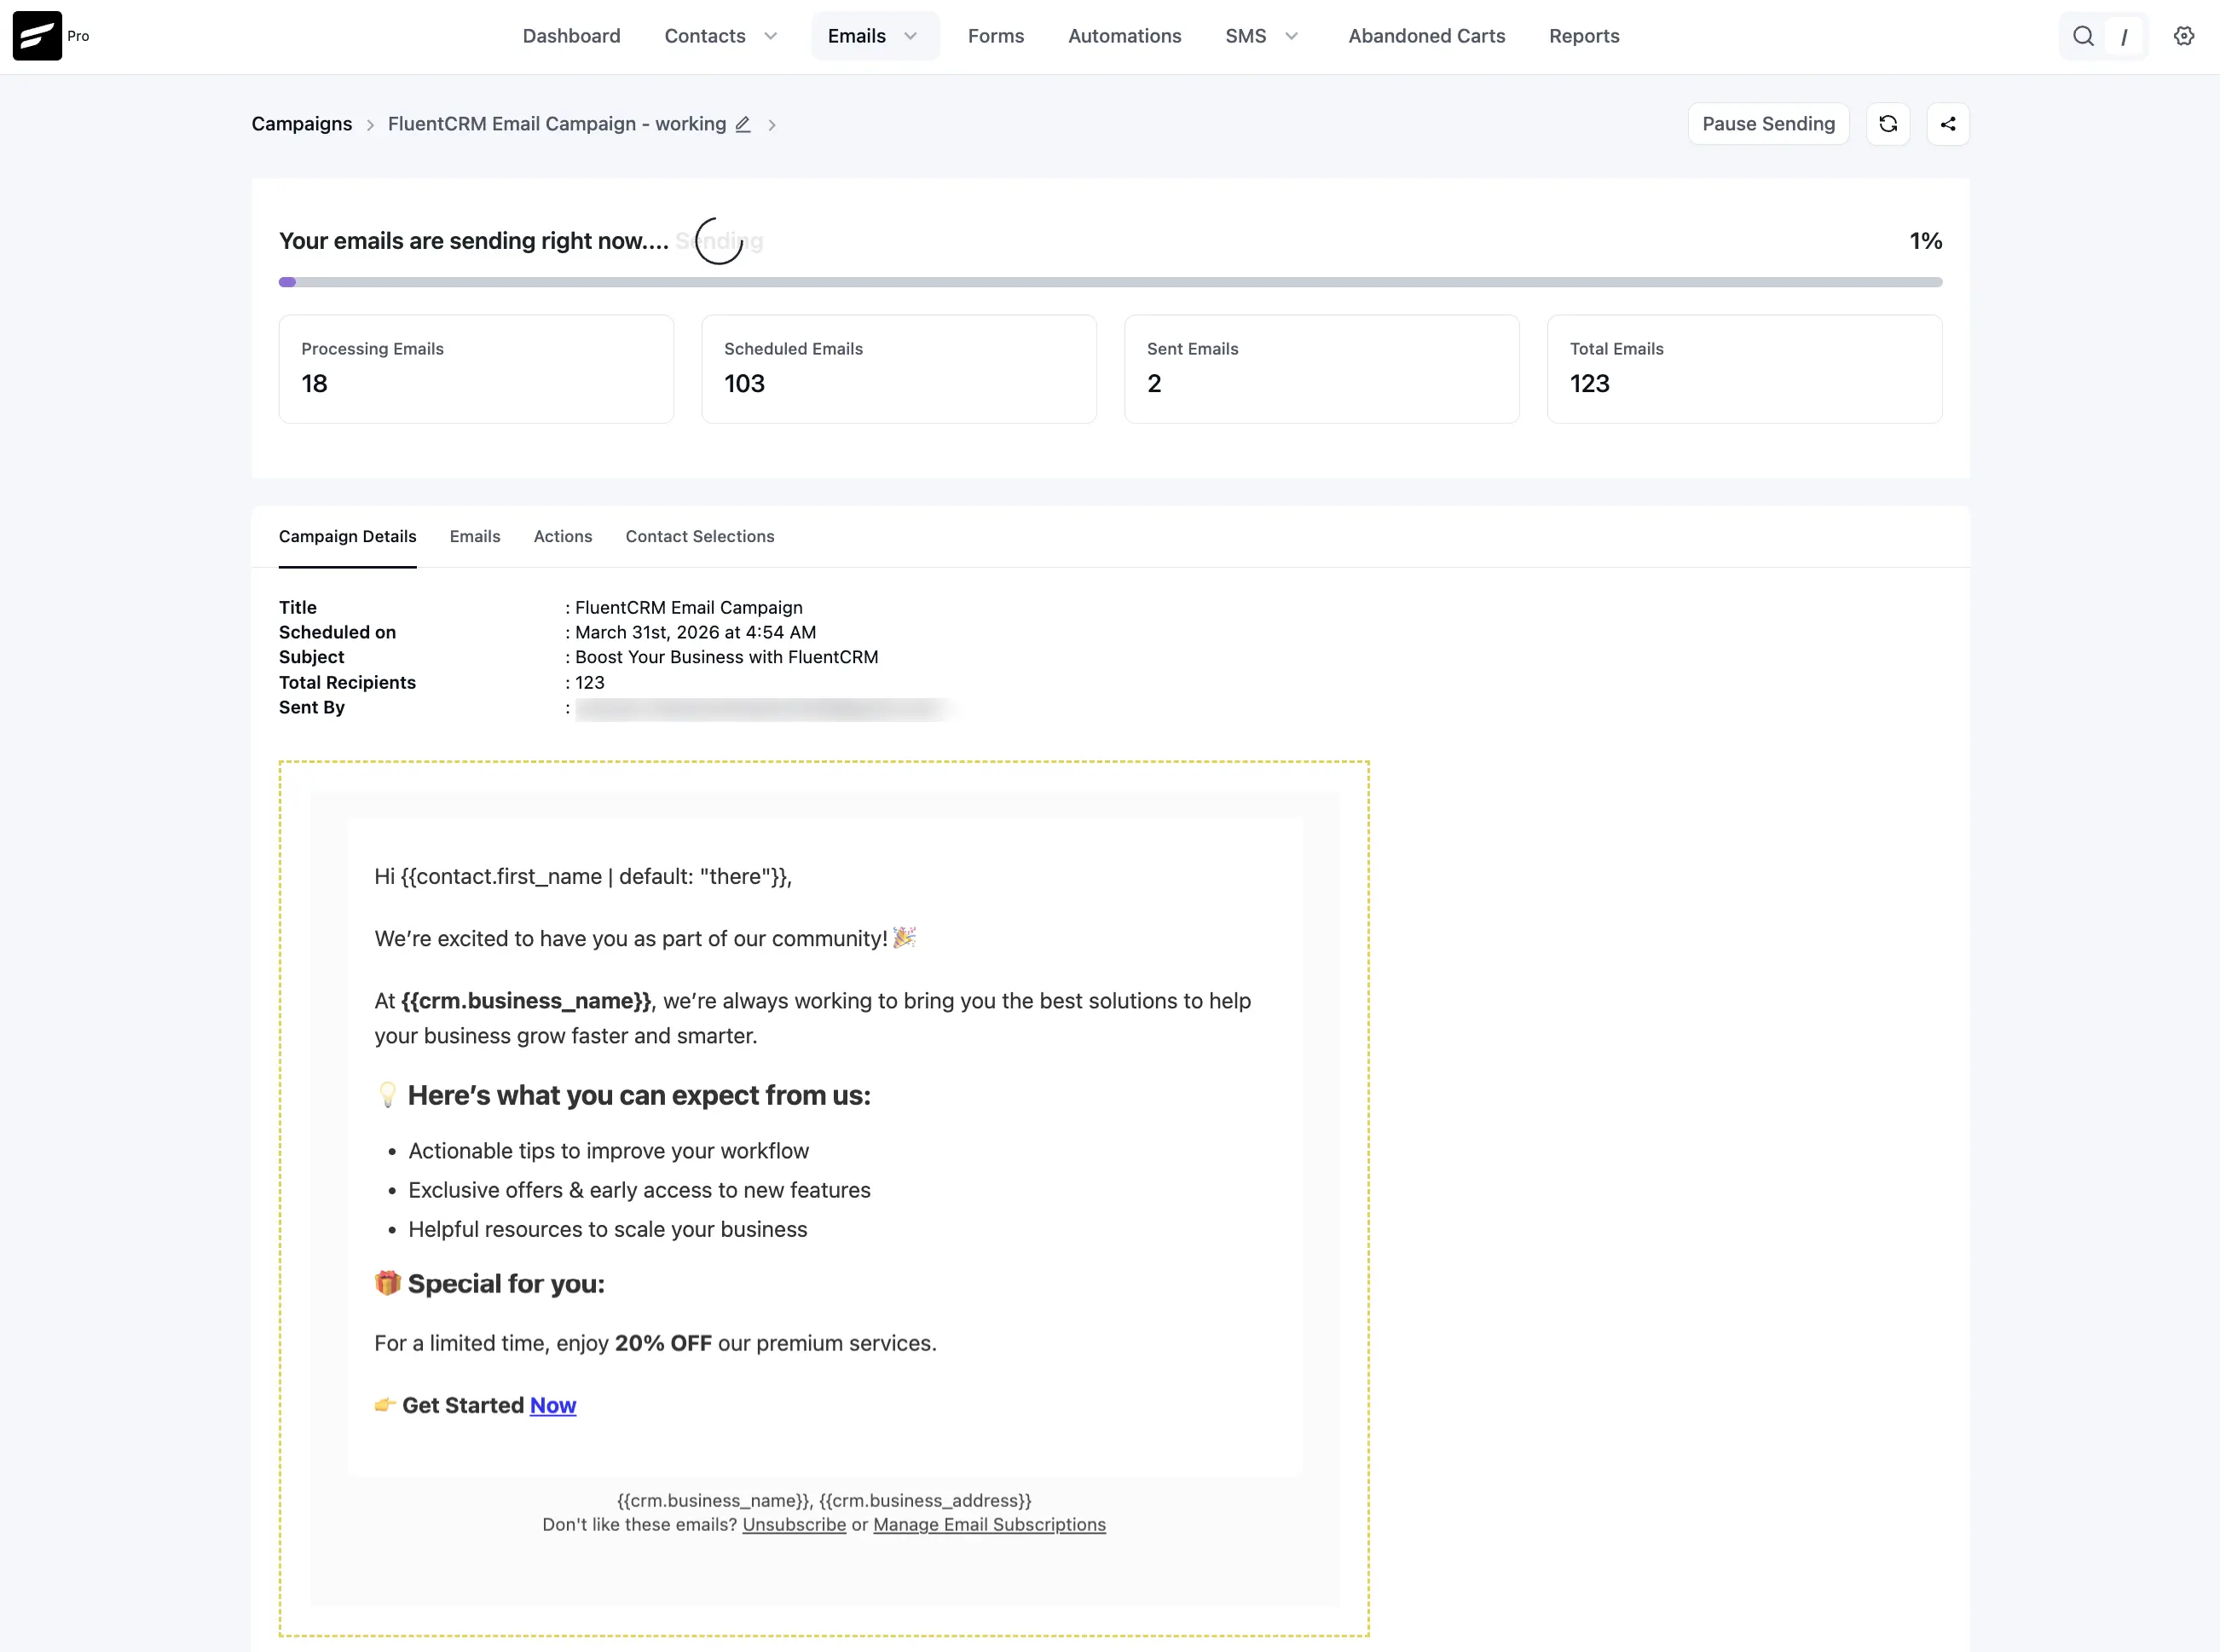
Pause Sending
If you want to pause the running campaign delivery, please click on the Pause Sending button.
Once all the emails are delivered you will then see the campaign summary with the statistics and some other actions. Please visit Campaign Summary & Actions to know in-depth details that are available in the summary.
That's all for Email Campaign creation and sending. Please visit the Campaign Summary & Actions documentation to Manage the campaigns or apply various actions to users of the campaign you sent.